Looking for the ultimate resource on building a van for your DIY campervan conversion? We cover everything you need to know in this epic van build guide!
We are passionate about finding the best and most creative ways to complete a DIY camper van conversion. If you’re like us and are caught up in van life and are looking to do a van conversion sometime in the near future, this post will outline the process of planning and building out a camper van!
We’ve lived in a variety of vans over the years, some in various stages of needing to be built out. As such, we’ve learned quite a bit about what we want and don’t want in a campervan we convert.
Even though most DIY van builds involve a steep learning curve, when we first started out we could not have told you the difference between a composting toilet or a cassette toilet. And while solar panels are virtually plug-and-play, we hardly felt comfortable snapping the connections together let alone drilling screws into the roof.
Now, we’ve gained experience and knowledge in learning how things inside a camper van work by fixing them. And in this post, we’ll walk you through the planning we’ve done, the decisions we’ve made and the projects and processes involved in any cargo van conversion.
As we’ve met with dozens of van dwellers, studied each one carefully and asked more than a few questions about how and why each did something in some way we’ve found that virtually no two van conversions are the same.
From determining how much storage space you want or need to how much power or water you can fit in, there is a lot of planning that goes into determining the basic layout of your tiny home on the road.
We hope you’ll find this post to be a step-by-step guide for planning every aspect of your future DIY camper van conversion. And we look forward to hearing from you on the decisions you make, tips for how you completed various projects and, of course, how your ultimate van conversion turned out!
The Process of Building A Van – A DIY Camper Van Conversion Guide
Like all great builds, the process of building a van starts with a vision. And for that, we’re sure you’ve already scoured Instagram, Pinterest and your favorite YouTube creators for ideas on what you want in the perfect van for your van life.
So remember what you saw and let’s get into the nuts and bolts, quite literally, of getting started with your DIY van conversion.
Considerations Before You Begin Your Van Build
Before you pick out the best van for your van conversion, you’re going to want to make sure you have an idea about the following concepts. Each one can have a big impact on which floor plan you choose for any number of different vans.
Will you be living in the van full-time or part-time?
If you plan to only head out on the weekends or a few weeks from time to time, you may not need to worry about adding too many luxuries to your van. But the longer you plan to live in your van, the more thought you should put into the pros and cons of different decisions.
For example, it may be OK to find public restrooms and/or use nature when nature calls if you’re only on a short trip. But this can grow wearisome and be very inconvenient if you live in your van full-time.
Related: Read our top tips for full-time van life.
How many people will be living in the van?
If you’re going to be a solo van dweller then you can cut a lot of corners that may or may not matter if you’re traveling as a couple or as a family. And a simple decision, such as adding a toilet or not, can be much simpler when you decide that you don’t mind the potential smell when you know it’s only your business is collected.
But with couples, you need more storage space and you’ll need to consider decisions that BOTH people agree to – like whether a shower is merited or not.
Throw in a few kids, which we’ve seen on the road, and now you need to have sleeping arrangements and additional storage for clothing, food and other items.
Will you be traveling with pets?
We would never consider traveling a mile without our two beloved dogs. And we know some great van lifers who feel the same about their cats. But each pet requires its own considerations – from food storage to where it can sleep – and you’ll want to factor your pet(s) into your planning process.

Do you want to be able to stealth camp?
The bigger and bulker your van build, the more noticeable you will be when stealth camping. So if you plan to spend your time in the city blending in with standard street traffic, you aren’t going to want massive solar panels, a ladder, roof deck and various toys mounted to your roof.
But if you’re not as worried about stealth camping, strap your toys anywhere you can and enjoy van life!
Related: If stealth camping is on the radar, be sure to check out our ultimate guide to stealth camping.
Do you want an inside toilet? Shower?
This is perhaps the biggest dividing line in most van dwellers we’ve met. While a toilet and shower is absolutely imperative to us, we’ve known lots of full-time van lifers who don’t have either. There are pros and cons to each decision you can make here.
Just know that you do have to make the decision and, once you do, it’s very hard to go backward on that decision once you’ve started your build. You may want to do a few trial runs in your van before deciding whether or not to add a toilet and/or shower.
Related: Check out this post on campervans with bathroom options.
Do you have any hobbies that require a lot of different gear?
Whether you climb, surf, bike, snowboard, ski, paddle or whatever you enjoy in the great outdoors – van life can be an awesome way to build a life around those activities. Just remember that you’ll have to stow your gear accordingly as you follow the seasons.
There are lots of creative ways to build storage both inside and outside of your van. But you’ll want to think about what items you’ll want and whether you really need to pack the inflatable kayak/paddleboard/etc if you only use it once every few months.
Do you want to cook indoors/outdoors or both?
Again, it seems like a simple decision. But you don’t have to build a complex kitchen setup if you plan to cook your meals outside. But at the same time, what happens if/when you find yourself in inclement weather? Thinking through your food preparation setup is important before committing to a floor plan.
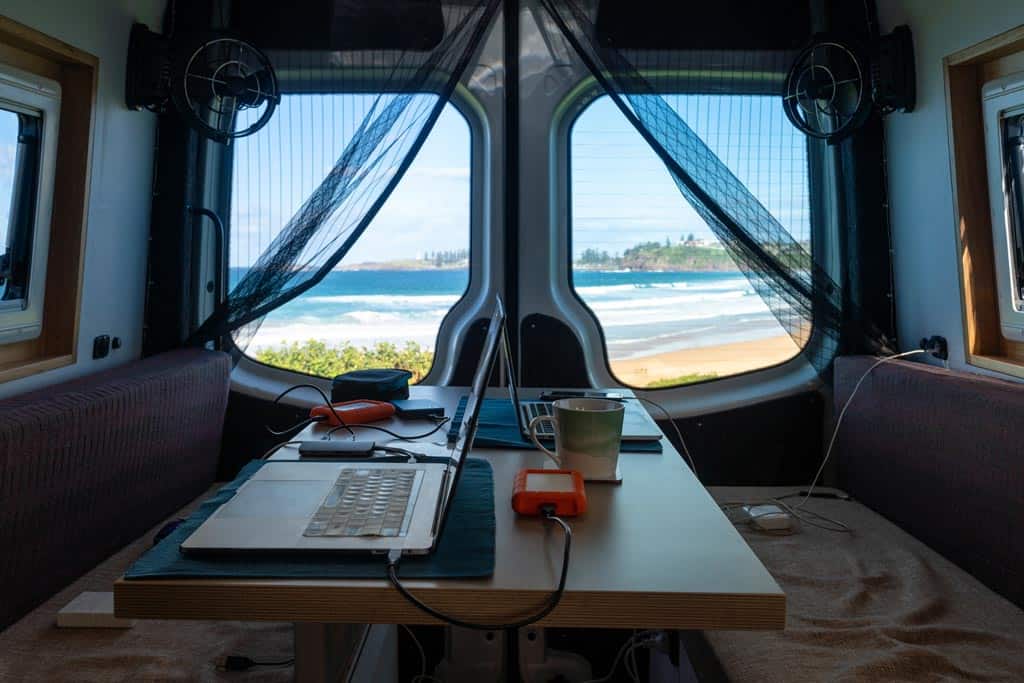
Do you need a dedicated office space?
We’ve met more van dwellers than not who work and/or run a business from the road. And we’ve seen all sorts of creative office setups. So if this is something that is important to you, be sure to account for a dedicated office space – or, better yet, multiple office setup options – in your van build.
Related: If you’re looking to make money on the road check out our post on top van life jobs.
Do you want to be able to spend long periods off-grid?
We find that power, water and food storage is incredibly important and top priorities for our van lifestyle. We don’t want to have to run into town every 2-3 days to refill our water or find a grocery store. But you may be OK as more of a minimalist who doesn’t mind leaving a great beach camping spot to run to town on errands.
This decision will impact all the major systems you will need to design into your van.
Other Considerations People Often Forget
It’s easy to look at an empty van and say “oh yeah, I can fit everything I need into this space.” But especially as you start building, space becomes limiting. And, aside from space, there are a few other considerations you should have.
Weight
It is important to keep your weight as low as possible. Being over the GVWR is not only unsafe, but it may also cause financial hardships in the event your insurance claim is revoked in an accident.
From the additional time it takes to brake to the wear and tear on your tires and suspension, consider all of the ways you can save weight during your build.
Everything Should Have Multiple Purposes
Try to think about how you can give as many things as possible a second or third use in your van. A lagun table, for example, works as a desk, table for meals and food prep.
And a convertible bed may offer the opportunity to have both a bed and table in one space. There are all sorts of nifty van life hacks to help
You Can’t Fit Everything You Think You Can
You’ll learn in the final moments of trying to pack for your van life adventure that you can’t pack everything into your van that you thought you could. The same may hold true for your build.
You may want the shower and toilet, but without the long-wheelbase van with the extended rear, you may not be able to fit it. Or you may want to fit a nice counter for your full kitchen but that may end up reducing the length of your platform bed.
There are all sorts of choices and compromises that you’ll have to make in the design and build of your van conversion. Keep that in mind and be flexible. But know your priorities in advance!
Related: Check out our best organizational hacks for van life!
Choosing the Right Cargo Van for your Camper Van Conversion
The first step in a DIY campervan conversion is choosing the right cargo van to build out. While there are various makes and models of campervans already converted for the road, chances are if you are reading this now you like us and are up for the challenge of building out your own van in the exact way you would like.
Whether you are trying to save money in the conversion or want to try and build a truly customized rig for van living, you’ll find there are all sorts of pros and cons when determining which van is right for you.
Of course, there is virtually no way you can study van conversions without coming across the following camper vans. These are the gold standards for van conversions and it’s highly likely you’ll end up with one or another of these makes and models:
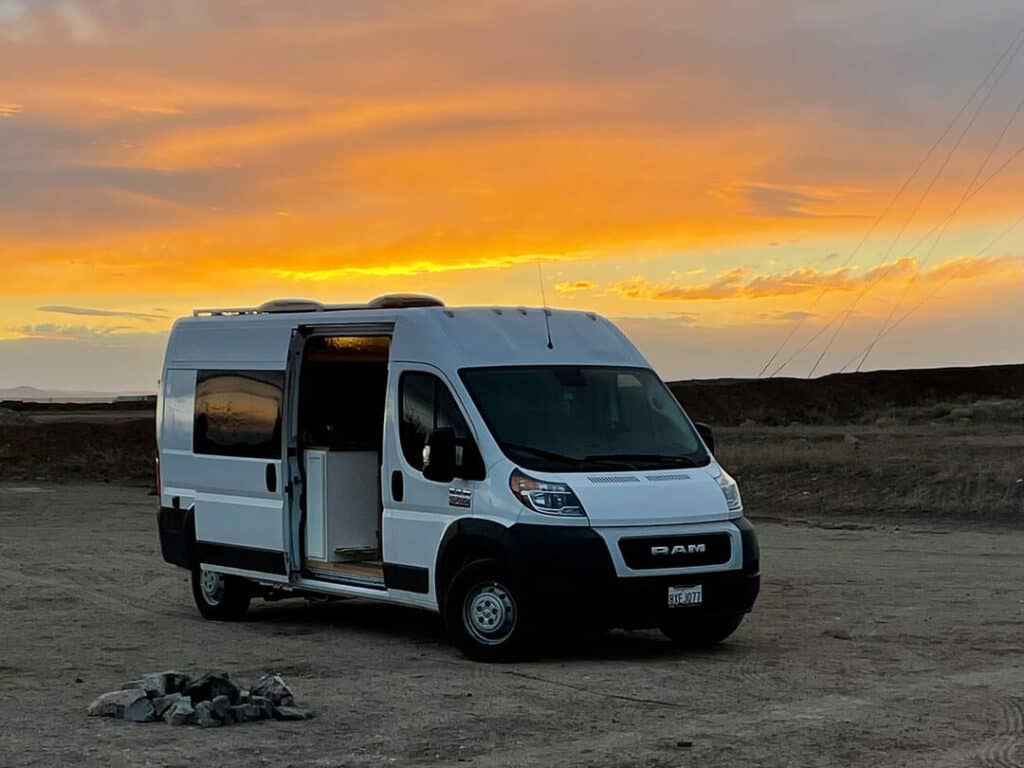

- Mercedes Sprinter
- Ram Promaster
- Ford Transit
- Nissan NV
- Ford E-Series (prior to Transit)
- Chevy Express
Chances are you’ve seen loads of these camper vans on the highway. And if you are like us, seeing one may have inspired you to dig deeper into van life.
Then, of course, there are other vans like the VW bus classics that kicked off van life years ahead of their time. Vans like the Kombi, Westfalia and Vanagon may take a little more TLC and have likely seen a fair amount of conversion already in their storied history.
But these are also popular vans for van life, particularly among the purists. VW bus options are not the best for a lot of the more rugged and adventurous van living. But they can sure take you to some incredible places and help you live more simply wherever you end up!
There are some criteria to consider when shopping for the best cargo vans to convert.
Roof Height
If you are anywhere near my height (6’4”) you will likely want to consider the higher-top versions of any of the vans on the market. The more common cargo vans come with high-top models that will cost you a little extra, but it is likely well worth the money, particularly if you plan to live in your van full-time.
Having extra space in your living area not only to stand but also to build for storage and appliances will go a long way when you consider this is your home for the indefinite future. Of course, the larger you are the more you will stand out wherever you go. So stealth camping may be limited with higher top vans.
But all things considered, we would suggest you only consider high-top conversion vans because the extra space is invaluable on the road.
Fuel Type
You may not care what type of fuel your conversion van consumes until your first trip or two to the gas stations to fill up. Diesel vans will typically get better gas mileage and have more torque for steep inclines. But diesel fuel will also cost more in most places and diesel engine work is typically more expensive.
If you are considering special appliances, such as diesel heaters, for your campervan conversion then the decision is simple. But when you weigh gas mileage, fuel prices and the availability of fuel and additives (if you must add DEF fluid to your diesel engine, for instance) the decision breaks down a little more.
We are more inclined to look for a gas-powered work van to convert because they are more common (only Mercedes Sprinter vans run on diesel), less expensive to work on and have an overall better fuel economy.
Wheelbase
A camper van wheelbase measurement is the distance between the front and rear axles and indicates the general length of your van. This is important because it correlates to the overall size and the living area of the van, which would impact the floor plans from which to choose.
But it also has an impact on your ability to clear terrain on steep rocks and grades. A longer wheelbase will have less ability to go up and down steep terrain without bottoming out. Longer wheelbases will also be harder to maneuver when it comes to taking turns.
But if you plan to for full-time van living, then you’re more inclined to opt for a longer wheelbase just for the additional storage space and living area inside the van.
2wd vs 4wd
Once you’ve made your decisions on the above criteria you can dabble in whether you think you will need 4×4 or not. Mercedes Sprinter cargo vans manufactured after 2015 are the only full-size vans with the option to add a 4-wheel drive out of the factory. However, this 4WD is more like AWD and does not have stellar reviews.
So unless you’re looking for a 2015 or later Sprinter van, you’ll have to have after-market work done to convert your van into 4WD. But if you think it is absolutely necessary to have, it comes with a hefty price tag and can be done at many different overland shops throughout the US.
Personally, 4WD is not as essential for van living as carrying a good set of traction pads and having a portable air compressor to be able to air down our tires if we really felt like we needed to get to more remote places to camp.
READ NEXT: Check out this post for more information on choosing the best camper van for your van conversion.
Selecting the right floor plan for your build-out
Once you have picked out and purchased your van you can begin to look at space considerations for how to maximize the whole van for your van life needs.
There are lots of factors to consider when determining your floor plan. Three of the biggest decisions involve bed type and location, bathroom setup and kitchen arrangement.
Bed Type and location
There are several common bed types when it comes to DIY van builds. Typically your first decision is whether you want a permanent bed or a convertible bed.
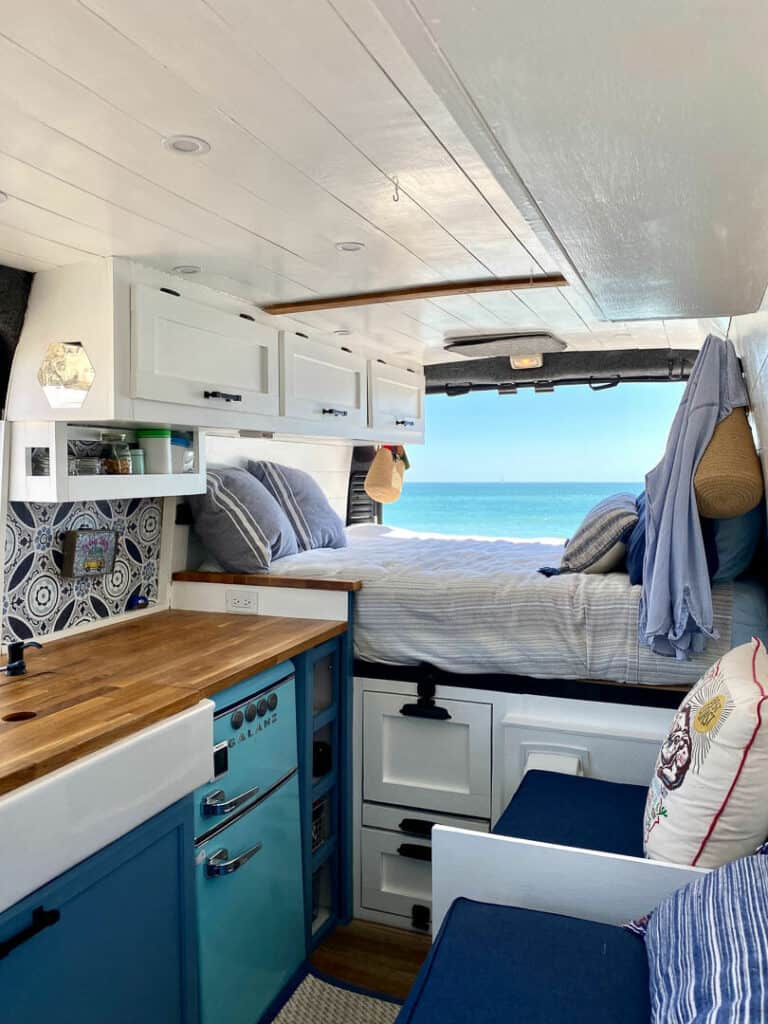
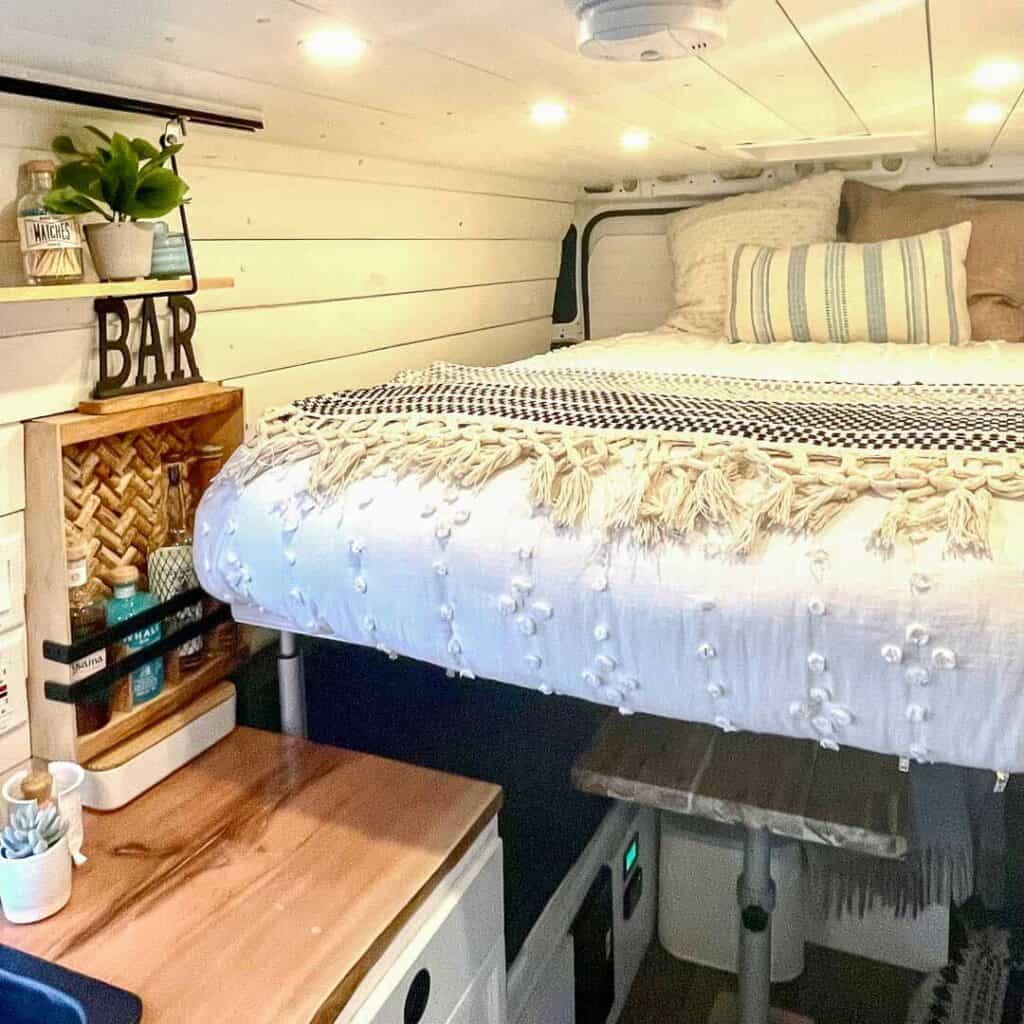
Permanent beds are typically built on an elevated platform in the rear of the cargo van in such a way that you have just enough headroom to feel comfortable climbing into bed at night with the maximum amount of storage space underneath the bed.
This storage space is often called the “garage” because it is where most van lifers will store the kinds of things you would normally store in a garage – from toys like SUPS, snowboards and climbing gear to essentials like water tanks, outdoor stoves and camping gear.
Convertible beds take as many different shapes as you can imagine and many serve multiple functions. Some convertible beds are couches during the day that slide out into a bed at night. Or they may be benches with a desktop that folds down into the bed. And you may even come across murphy beds that fold up against the wall when not in use.
Convertible beds are an advantage because they can serve multiple purposes in taking up the same space. However, if you are not keen to make your bed every morning then they can also be a hassle. If you don’t convert them back each morning then you are left with a living area that is cluttered and perhaps inaccessible because of the bed.
Personally, we prefer the permanent bed structure to maximize our storage area (while also giving us the grace to leave our bed unmade if we choose to!).
READ NEXT: Check out these great camper van bed design options for your van!
Bathroom Setup
We’ll touch on this topic more in the plumbing section below. But a big consideration with your floor plan is determining if you want a bathroom, whether to add a toilet and/or shower and where to locate the bathroom.
If you are a minimalist you can likely get by with the most basic of bathroom setups. Consider a 5-gallon bucket or a cheap portable toilet for your business and an outside shower when you need it.
But if you would like to add a little more comfort (and class!) to your DIY camper van then you will want to put a little more thought into your bathroom setup. Top-of-the-line Class B vans may come with “wet baths,” which would combine the toilet and shower into one enclosed space in the camper. This is advantageous, of course, if you want both a toilet and a shower in such a small space.
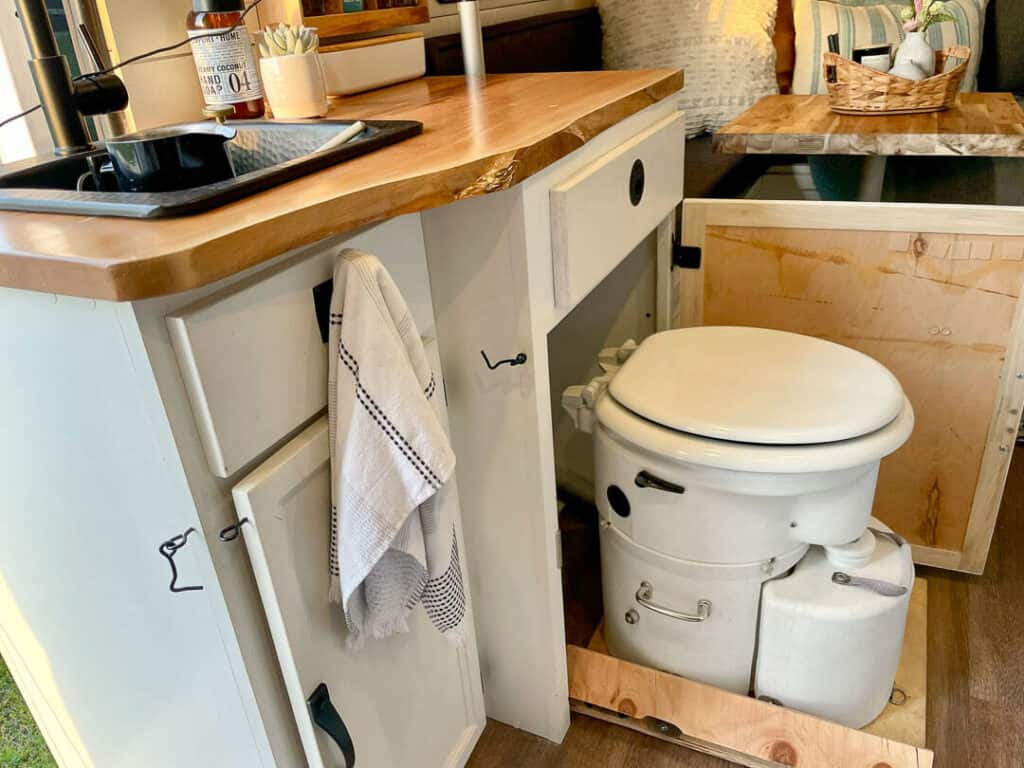
Many van lifers will opt to leave the shower out of the van and just focus on the toilet. In this case, toilet options are fairly simple: portable toilet, standard RV toilet, cassette toilet or a composting toilet.
With portable toilets, some DIY van conversions actually stow the toilet inside a cabinet and retract it when needed. And in others where there is a fixed toilet, you may build a private area around the toilet like a home bathroom.
EXPERT BUYER’S GUIDE: Check out this post to learn more about different campervan toilets!
Once you decide exactly what toilet and/or shower arrangement is best for your comfort level, you need to decide where to place it. If you opt for a standard plumbed RV toilet then you will need to account for having a black tank to hold your waste and the plumbing involved to get your waste there.
Flushable toilets will also need running water plumbed to them. So you will want to assess the best place for a black tank on your camper van before deciding where to locate your toilet.
However, if you opt for a van conversion with a cassette toilet, composting toilet or portable toilet then your options are not limited by a black tank or plumbing. Composting toilets are increasingly more popular in van life because they don’t require running water or a black tank.
With each of these three options, you will have to manually remove your waste from the toilet. But they are great space-saving options because they can literally stand alone anywhere in your campervan floor plan.
Finally, whether or not you want/need a hot shower INSIDE your van is the next big decision. Many van lifers will complete their van conversion by leaving the shower outdoors. This saves space inside the camper van for other wants and needs and often these van dwellers will find plenty of shower options on the road.
Whether camping in an RV park with amenities from time to time, jumping into a mountain river or lake or finding facilities that offer free showers, you do have options if you elect to leave an indoor shower out of your camper van conversion.
Some popular outdoor shower options include the simplest form of running a 4” black PVC pipe along the roof to more expensive hot water on-demand showers that still require a water tank or other nearby water source.
Whether or not you want an indoor shower is up to you. But having previously lived in a camper with a wet bath, we lean toward this combination option in our van build.
READ NEXT: Need ideas for your bathroom? Check out our post on the best camper van bathroom ideas for any van!
Kitchen Arrangement
The last major space-hog consideration in your DIY campervan conversion is your kitchen arrangement. This, again, comes down to a level of personal choice and comfort.
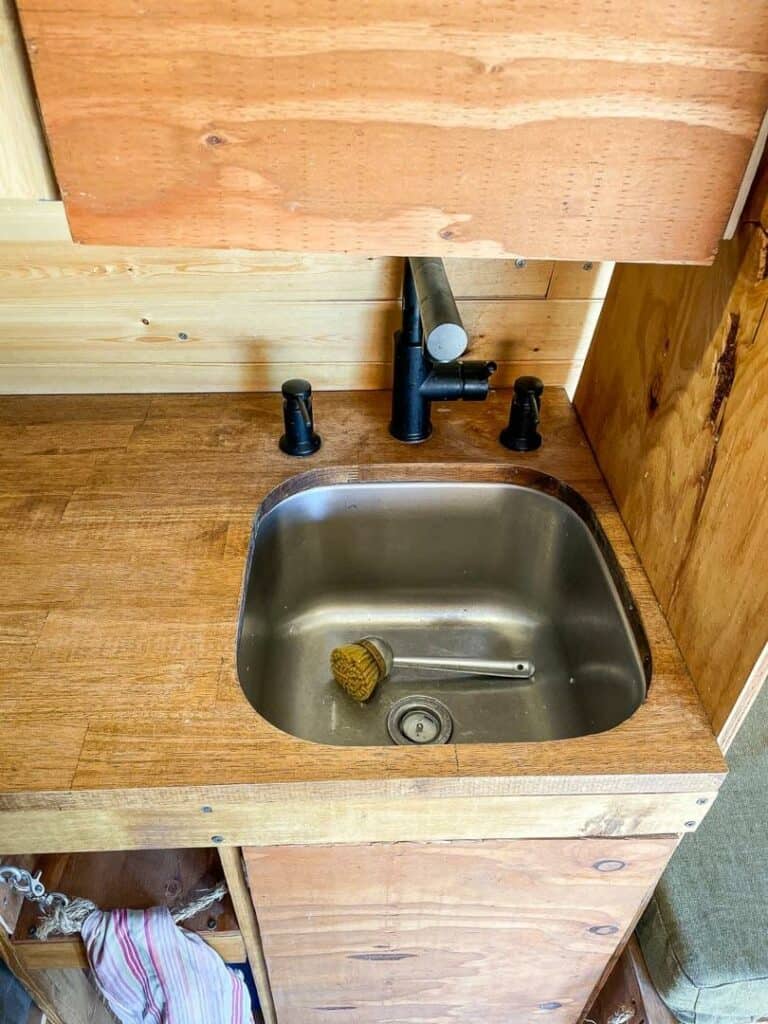
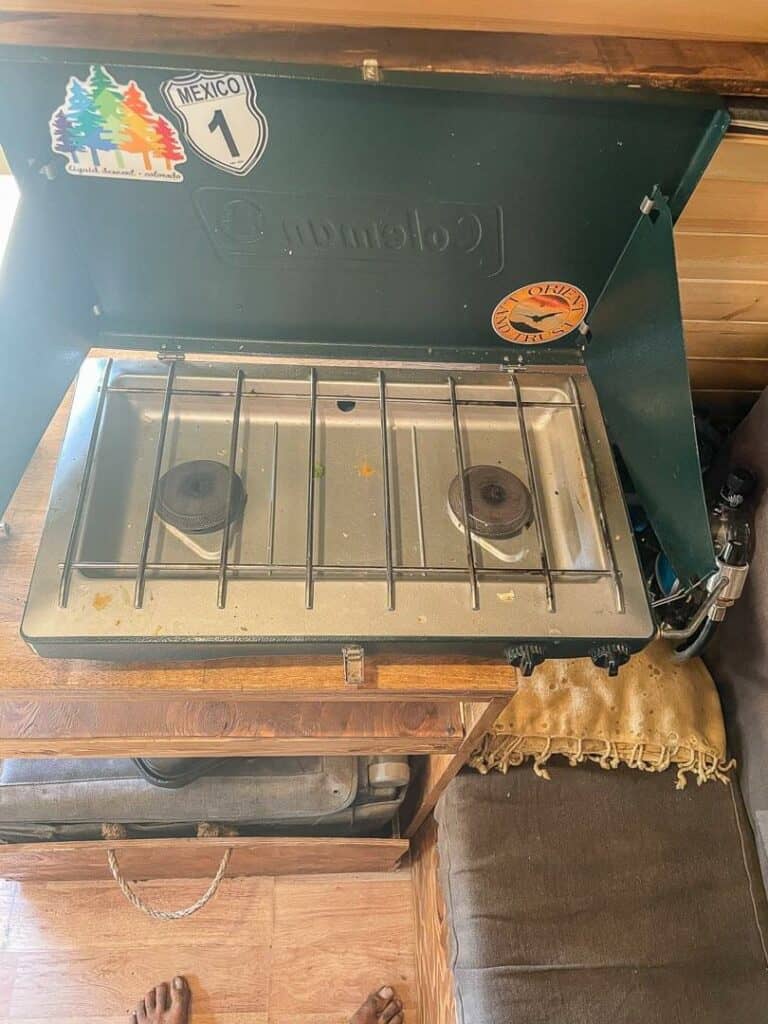
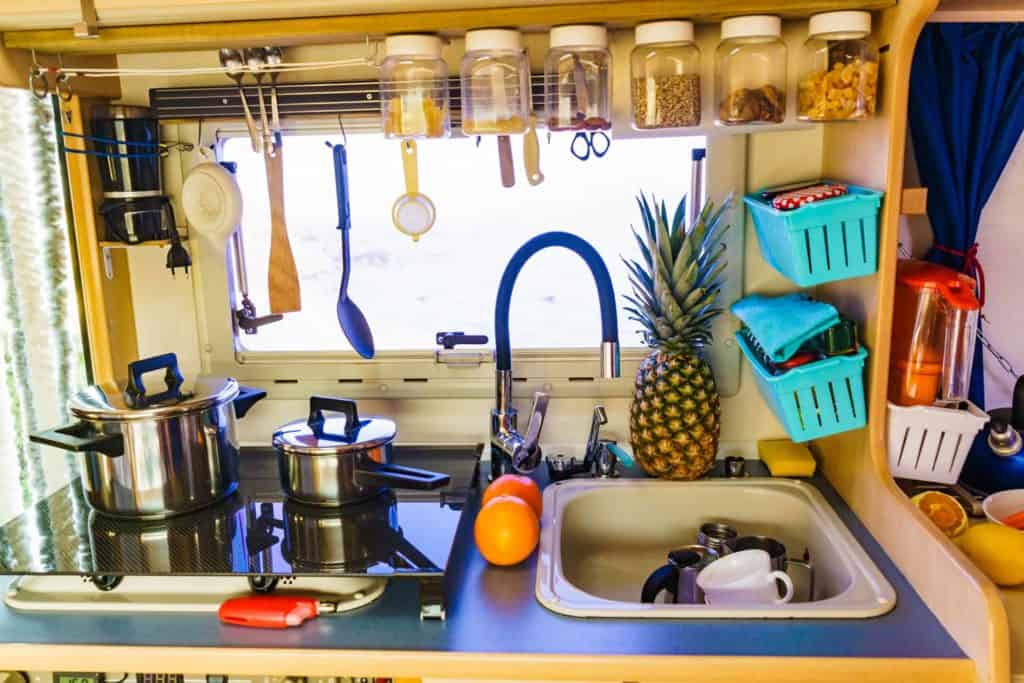
Minimalists will not dedicate much inside space to a kitchen. They will create a rudimentary sink, typically with a manual water pump, portable water tank and portable grey wastewater tank and pair that with a decent camping stove to cook outdoors as often as the weather permits.
Minimalist van lifers may also opt for simple ice-chest coolers instead of refrigerators or more versatile thermoelectric coolers. For them, stopping for ice every few days is not as inconvenient or costly as buying and installing a more complex campervan fridge.
EXPERT BUYERS GUIDE: Learn more about the best campervan fridge options in this post!
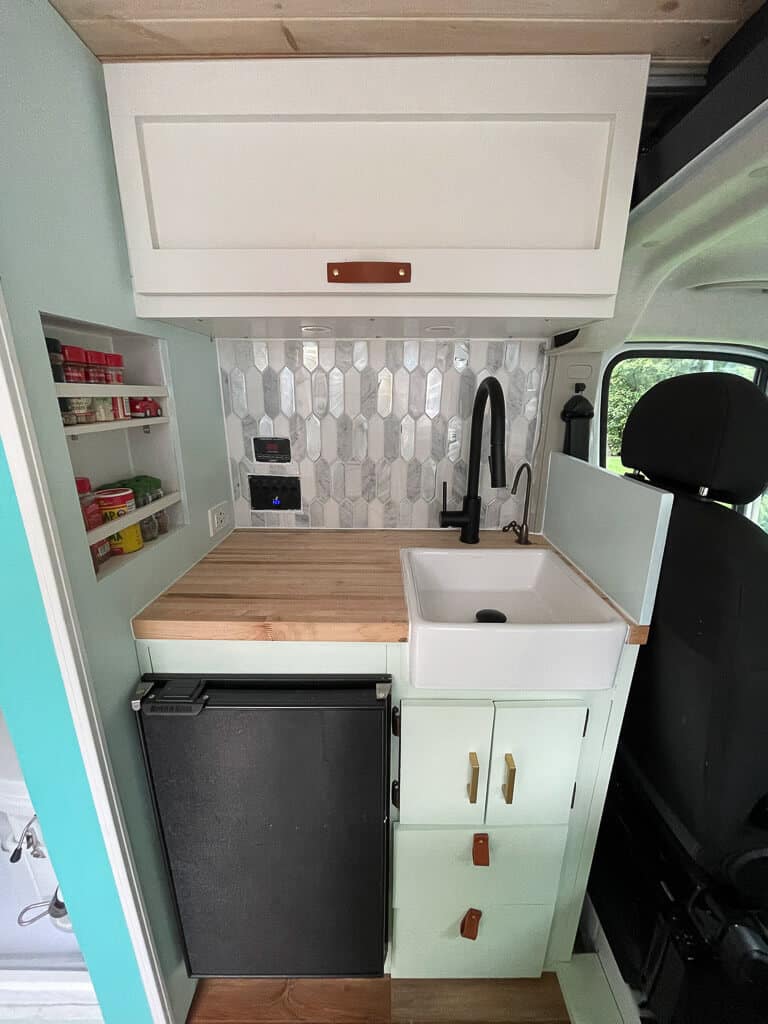
However, most DIY camper van conversion plans will include ample space dedicated to the kitchen. While you could save a bit of space and a few hundred dollars by not investing in standard RV kitchen appliances, the convenience of having everything you want or need in a kitchen outweighs the upfront costs and installation, particularly if you plan to live in your campervan for any extended length of time.
Some key items that you will want to consider are:
- Refrigerator
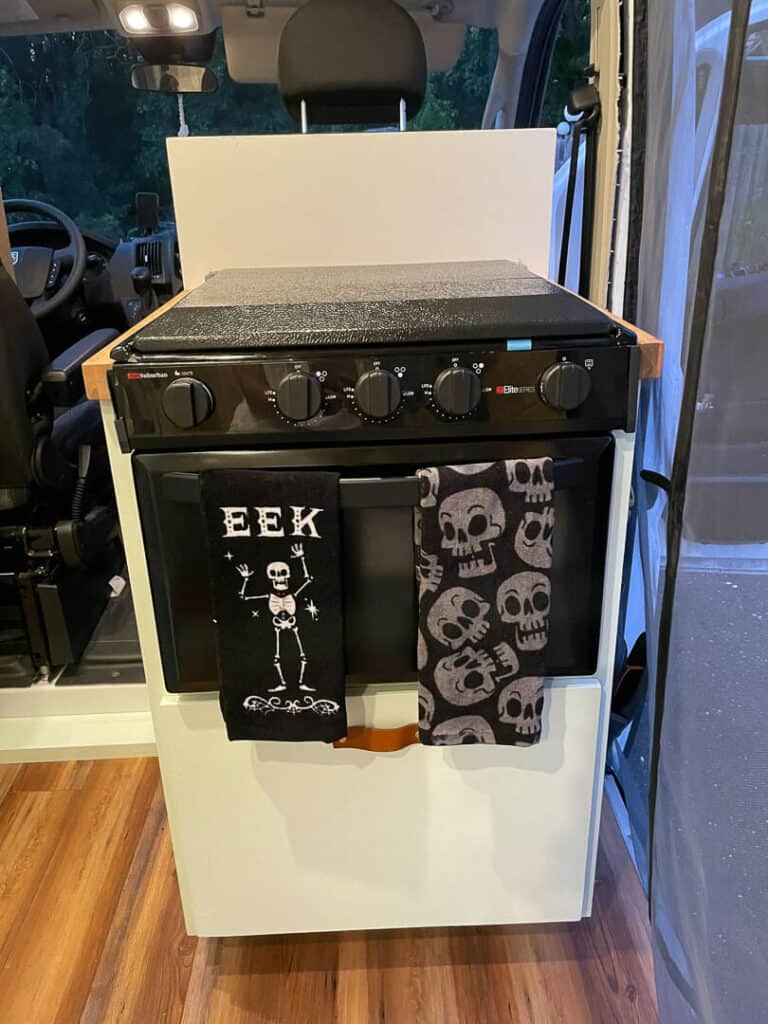
- Oven and/or Stove
- Sink & Faucet
- Counter space
Each of these has its own set of criteria and we encourage you to check out the corresponding buyer’s guides to find out more about the different models, dimensions and functions available for each.
Personally, cooking healthy meals is an important part of our van life. So our camper van conversion will dedicate plenty of space to account for the appliances we will want to be able to prepare, cook and clean up after meals we make ourselves.
READ NEXT: Read this post to find out great information on the best campervan kitchen ideas for your van conversion.
Other Space Needs
Of course, there are other space needs you should consider in your floor plan as well. These are more custom to your personal preferences and activities. But definitely consider the space you will want if you need an office (that is not your bed or passenger seat) and any accompanying technology such as computers, monitors and other devices.
And if you are a family of any size, take your children into consideration. This includes any pets you may have and the space you will want to provide them in their home on the road.
Lastly, consider any gear you may travel with such as mountain bikes, climbing gear or other outdoor activities. Some of these items will stow away nicely on roof racks or cargo racks on the exterior of your van.
But as you consider your entire floor plan and living area be sure to account for everything you think you will travel with on your road trip.
Understanding the Basic Systems: Power, Plumbing, Propane
With the major space consumers accounted for, it’s time to get into the details of the systems you will need to include in your van conversion. The primary systems of any RV include the electrical system (or power system), plumbing system and propane system.
Each of these deserves much more in-depth understanding, particularly when it comes to safety. But here are some of the basics you should consider with your DIY camper van conversion.
Electrical System
Your camper van electrical system is arguably the most important, costly and potentially dangerous of the major van build systems. First, you need to understand that there are two forms of power in standard RVs that you will want to account for in your van build.
Understanding AC Power
First, alternating current (or AC) is the standard electricity that you are likely used to being around. AC power in the US is 110-120 volts and can be deadly if you are exposed to it directly.
But when it comes to van life, you are likely going to want to include it in your electrical system even if you plan to spend much of your time off-grid.
“Shore power,” as it is called, can be pumped into your power distribution center in your van and then either converted into 12-volt direct current (DC) power for your batteries and 12-volt appliances such as lights, fans and water pumps, or it can be channeled into your standard 3-prong power outlets for direct use in AC appliances.
To correctly and safely integrate AC power into your camper van takes more expertise than this guide is intended to provide. But essentially you will need to consider investing in the following items, in addition to the wiring between them:
Power distribution center
The power distribution center receives the 120-volt AC and allows you to fuse the power through a breaker box (like you’d find in any home). From there you can run proper Romex wiring to outlets or appliances that may require AC-only power, such as a microwave or air conditioner.
AC/DC power converter
An AC/DC power converter is often built into the higher quality power distribution panels because it is a natural place to take the 110-volt AC power and convert it into 12-volt power. With a power converter, you are able to then move this 12-volt power throughout your camper van, most directly to your batteries where you will then run wiring to all of your DC appliances.
It is during this process that the battery charger built into the converter will also monitor and keep your batteries topped off so that if you ever needed to recharge your batteries quickly you could count on a 120-volt power connection to do that.
3-prong power outlets (if desired)
If you would like the comforts of home by having AC power outlets throughout your camper, this is where you would connect them from the power distribution panel through Romex wiring. They would only work when you had your shore power plugged in, which is a big reason why most van builds will skip the AC power input from shore power and rely only on DC power.
AC appliances (if desired)
There are some appliances that only run on AC power, such as an air conditioning unit, microwave and some kinds of refrigerators. If you plan to include these in your van build you will need to consider installing an AC power system.
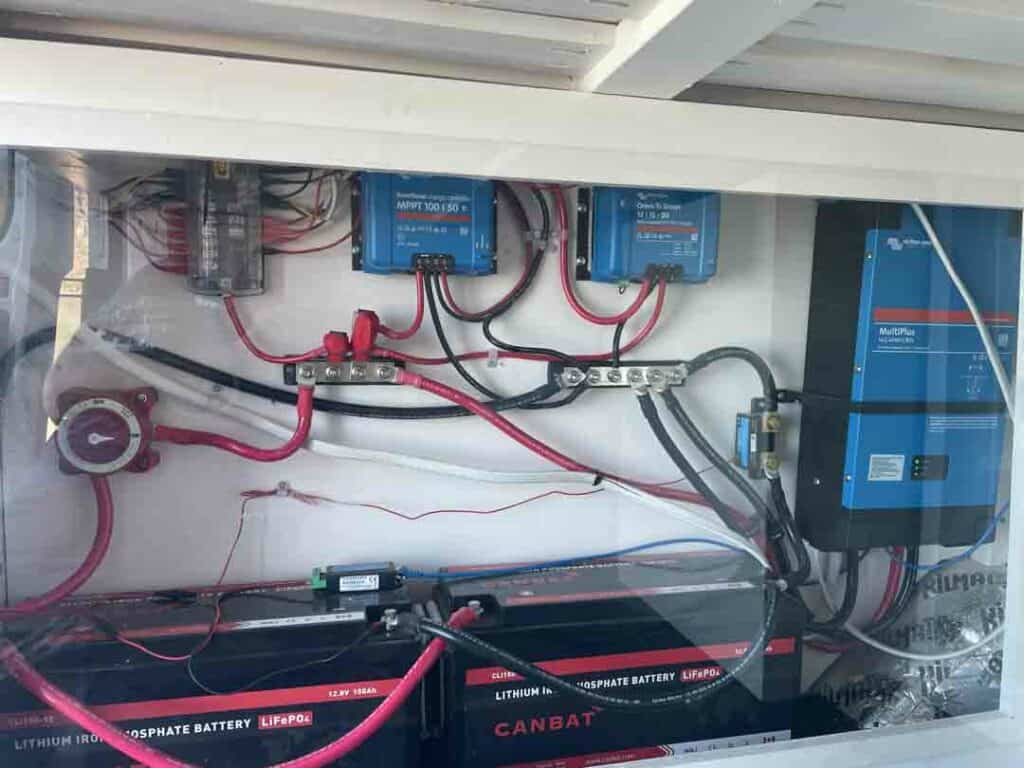
Understanding DC Power
Your DC power system is going to be the most important part of your electrical system. In many cases in van life, a camper van conversion may skip AC power altogether as it is more of a convenience factor, particularly if you think you will spend more time in an RV park or camped in a driveway.
But DC power gives you the ability to power virtually anything you’d want as long as you have the right components and sizes.
Your DC power system is built off your battery or batteries, known as a house battery bank. From there, 12-volt power is drawn into a fuse box to protect your appliances and keep you safe from an accidental fire. Then you can send that power in any direction you want to power the appliances you will want and need.
Common appliances powered by your DC system include:
- Lights
- Fans
- Water pump
- 12V Cigarette Lighter Outlets
- Fridge
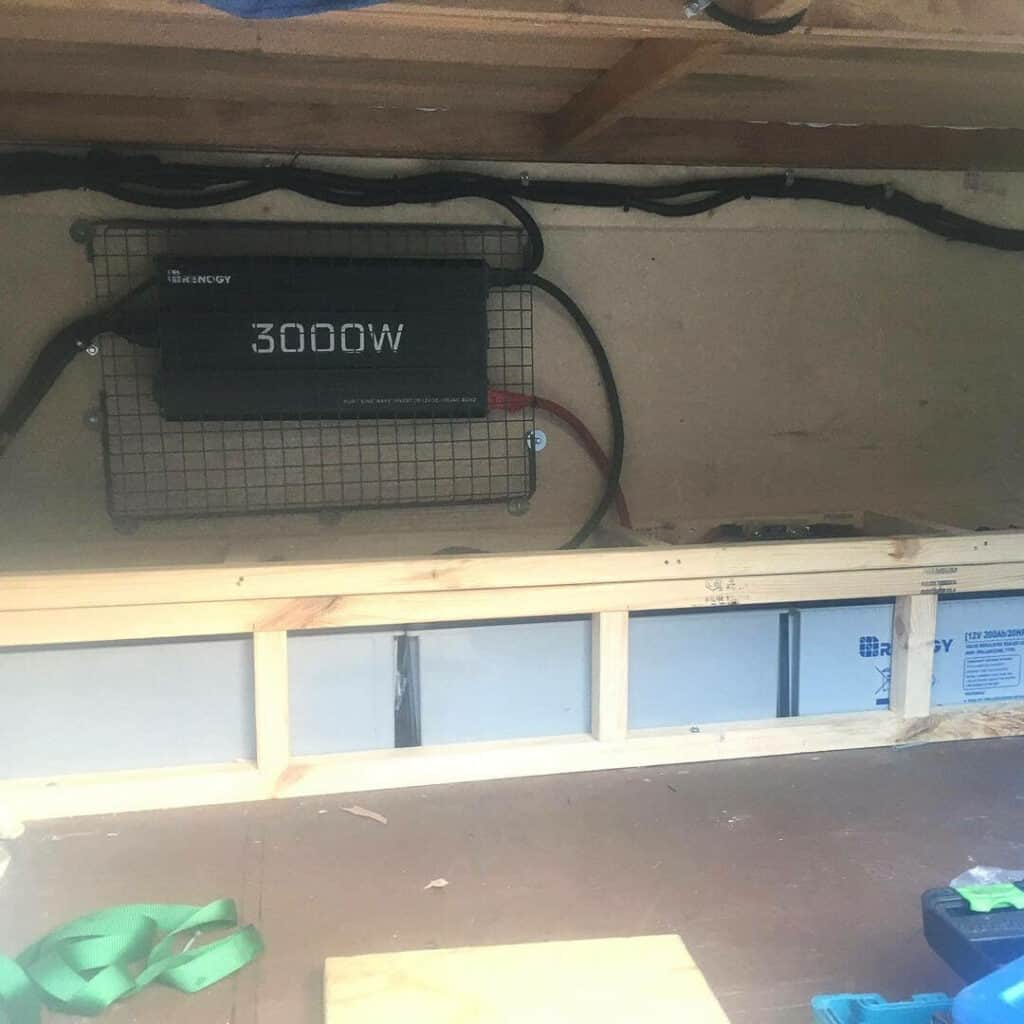
If you include a power inverter in your electrical system (which we HIGHLY recommend) then you can also invert the 12-volt DC power into 110-volt AC to be able to plug in appliances and devices that only run off 110 volts.
Power inverters are virtually essential at this point because most of the van life world revolves around plugging in computers, cell phones, tablets and other devices. We don’t recommend that you skimp in your budget or floor plan space when it comes to adding an inverter.
EXPERT BUYER’S GUIDE: Check out this post to find the best inverter for your van build!
A note on inverters: There is such a thing as “too much” inverter. The size of your battery bank dictates the appropriate size of your inverter. Just because you install a 3000W inverter does not mean that your battery bank can handle that kind of power draw.
So we recommend looking to install no larger than a 2000W inverter with at least 200-300 Ah battery capacity (less with lithium batteries) unless you have extenuating power needs that likely exceed this guide’s recommendation anyway.
READ NEXT: Check out our post on how to design a great campervan power system.
Choosing the Right Battery
Among the many other costly decisions you will need to make is determining which type and size of campervan battery is best for your house battery bank. You will NEED to select a deep-cycle battery (typically indicated for use with RVs or boats). But there are 3 main types of deep cycle RV batteries on the market.
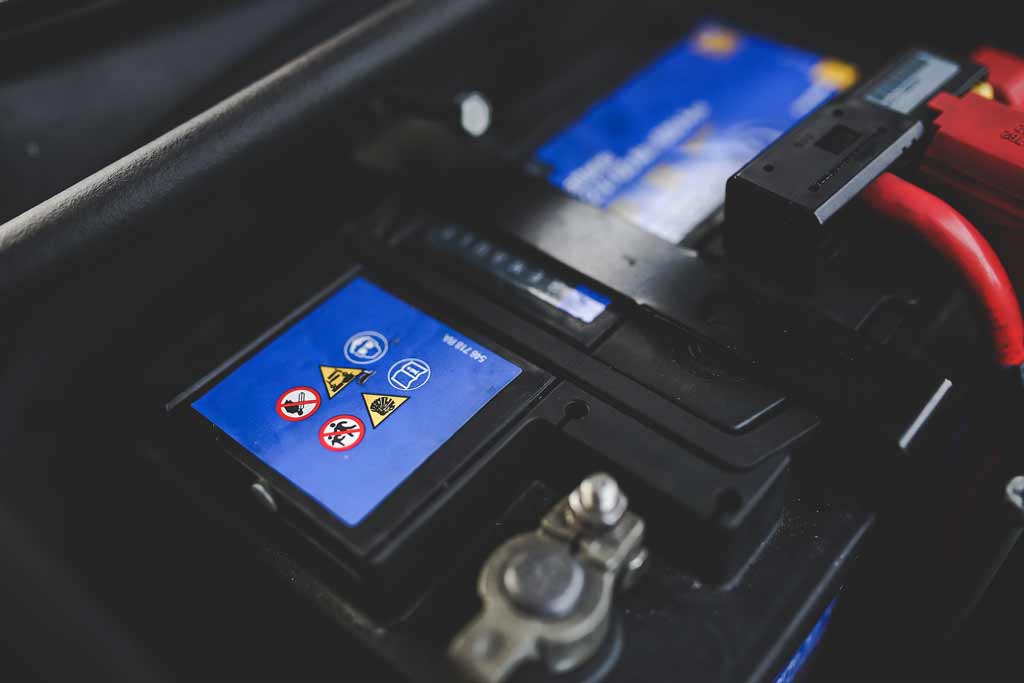
Flooded Lead Acid batteries (FLA) are the old-school norm for batteries. But when it comes to a DIY camper van build you will want to pass on these. They are much less expensive than the next two kinds.
However, they require regular maintenance, don’t handle bumps and must be very well ventilated. Plus they can only be discharged to 50% of their capacity before you start to kill it. Take a hard pass on these batteries.
AGM batteries, or sealed flooded lead-acid, are the next step up and well worth the additional cost. These typically start in 100 AH increments and do pretty much everything a standard FLA battery doesn’t.
They are rugged and can handle bouncing around, don’t require you to do a thing to keep them working, can be installed in areas with little ventilation and can be mounted in any orientation except upside down. You can also discharge these to 40% of their capacity before inducing damage.
Lithium batteries are quickly becoming the gold standard, particularly in camper van builds and van life in general. These provide the same features as AGM batteries with the exception that they can be discharged to virtually nothing (like your cell phone battery) without doing damage.
They are pricier and they can’t be charged in freezing temperatures. But with prices coming down quickly and the fact that you can build additional layers of insulation around them, there is no reason why you should consider anything other than lithium for your van build.
EXPERT BUYER’S GUIDE: Check out our post on the best batteries for campervans.
A note on batteries: If you were to invest your last dollar into bigger battery capacity, inverter or even solar panels, you will get a better return on investing in bigger and better batteries.
Charging Your Electrical System
Now that you understand the basics of camper van power and why it is so important to focus on your DC power system, you should start to think about how to recharge your batteries.
There are several common ways to do this:
- 110-volt shore connection
- Van alternator
- Generator
- Solar panels
As discussed, if your camper van build includes 120 volt AC power then you can simply plug in and let the system do its thing.
But if you don’t incorporate AC (which is common with a DIY camper van conversion) then your first option is to connect your vehicle battery from the engine compartment to your batteries via proper fusing and a battery isolator.
A battery isolator will keep power from flowing from your vehicle battery to your house battery bank. Thus you don’t have to worry about your van not starting in the morning if you happen to draw your batteries down too low the night before. This is a great option and should be part of your van build plans as it provides “free” energy to your power system while you are driving.
Another more costly and bulkier option is to add a generator to your camper van. Honestly, this is not a great idea and we have met very few people in van life who incorporate a generator into their van build.
In addition to their cost, generators can be loud, emit dangerous exhaust that must be properly ventilated and require an additional source of fuel. We’d recommend you pass on adding a generator to your camper van unless you have extenuating power circumstances.
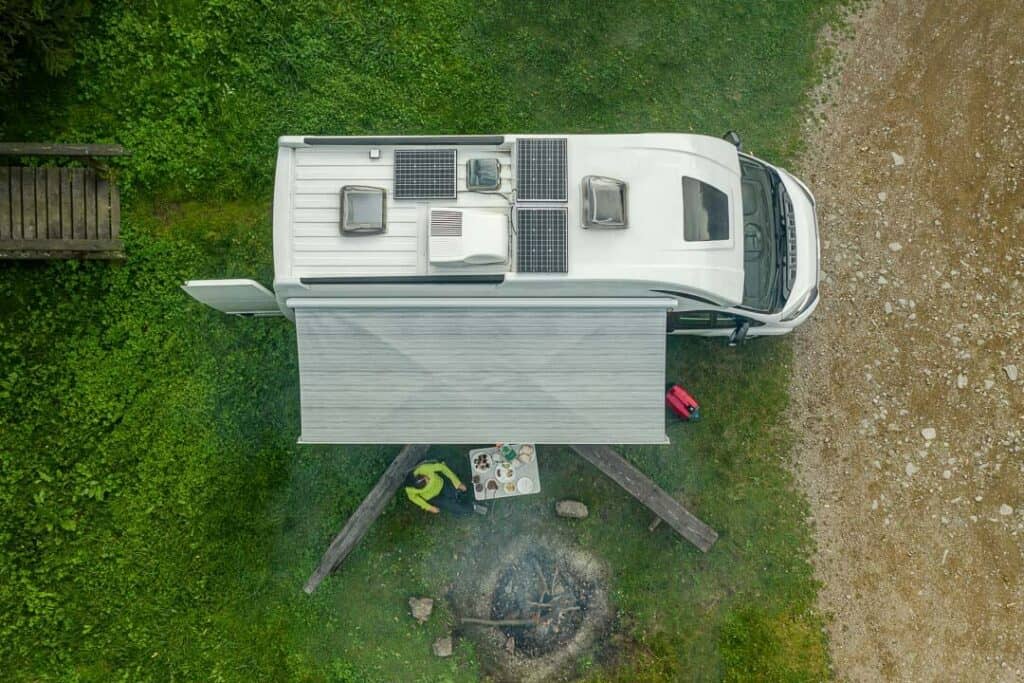
The next best option for recharging your batteries is to invest in a decent solar panel system. You can usually tell work trucks from van lifers by the presence of solar panels on the roof racks.
At this point in time, we advise you to plan and budget solar into your camper van build because it will provide you with literal years of worry-free renewable power with a minimal initial investment.
We’ve got a great post on what you need to do to set up the optimal solar power system for your camper van. But essentially you need to consider adding the following components to your van floor plan and consider where you will run wiring before you commit to the first screw, hole or other initial stage of your actual build.
- Solar panel(s)
- Mounting hardware (“z-brackets”)
- In-line fuse(s)
- Cable entry housing
- Breaker/Fuse(s)
- MPPT Charge Controller
A note on PWM charge controllers: When investing so much into the van build itself it is tempting to try and save a few hundred dollars here and there. And there are some great solar panel starter kits out there. But beware of any that offer PWM charge controllers. A PWM controller is basically obsolete technology that is cheap and inefficient. Any kit you select should come with an MPPT charge controller.
READ NEXT: Plan the best van life solar setup using our guide!
Plumbing System
The next important system to account for in your floor plans and budgeting is your plumbing system. Like other van build projects, your plumbing can be as minimalist or as complex as you would like.
You will want to think about whether you want running water and to what various appliances. Also, consider whether you want pressurized water to come from an electric water pump or a manual foot or hand pump.
Your plumbing system will also be responsible both for how you store fresh water and collect wastewater. At the minimum, you will want to consider the following components of any complete plumbing system and determine which, if not all, you will install in your DIY camper van conversion:
A Minimalist Approach
So a minimalist may consider using a 5-gallon container with either a hand or USB-powered pump for drinking water. A similar 5-gallon container may also store water beneath the sink that can be pumped using a foot or hand pump and minimal hoses.
Wastewater from the sink could then collect in another 5-gallon container to be emptied without the need to install a grey tank. A minimalist in van life would have no need for an indoor shower and instead would rely on a DIY PVC outdoor solar shower when they weren’t searching for free showers.
When it comes to toilets, a minimalist will opt for a composting toilet at best, with either a cassette or portable toilet as the likely option. And hot water? Forget about that!
A More Thorough Approach
While you may likely find yourself planning and completing this portion of your camper van build somewhere in between the minimalist and the really nice and expensive Class B Leisure Travel Vans, we want to give you an idea of a more convenient and sustainable plumbing system that would more than adequately meet your needs.
Whether you want to search for free showers would be up to you!
Fresh Water Tank
Your plumbing system should start with your fresh water tank. And from years of experience camping and living off the grid, we would recommend that you commit in your floor plan to installing the largest possible tank you can fit (with everything else that needs to go in your van build!).
We would recommend a 30-gallon tank as a starting point. And you’ll want to position it in such a way inside your camper that is both accessible for plumbing and repair purposes, but near if not on your center of gravity.
If you are not willing or able to install it there, we’d advise that you try and center it on your rear wheel well. At 8 lbs per gallon, the weight of water adds up and you want that weight in a good spot. There are even custom tank makers who build wheel-well tanks just for this purpose.
You’ll want to think about both your water inlet and outlet locations as well. For the inlet, you may want access to the tank through your rear doors to save from having to cut a hole in the side of your camper.
But if it’s more convenient to have a better location for your tank and run a hose clamped to a water inlet valve you are going to have all the confidence in the world to punch a hole in the side of your van to install the inlet after all of your other projects! For the outlet, think about the general direction of flow from the tank to the water pump, which is the next appliance on the list.
Water Pump
12-volt electric water pumps are relatively affordable and quiet and they take all the work out of generating pressurized water. We’d recommend one with a 2.5-3.5 gallon per minute range. Anything more or less is not worthwhile for a camper van build. Use Pex tubing and shark bite adapters to run water from your tank through the pump and in the directions it is needed for your other plumbing appliances.
Sink
While we have owned RVs with both a kitchen and a bathroom sink, it is likely you’ll want to consider just one sink that handles all your cleaning business. So you will want to consider splitting off the hose from the water pump to the sink if you have other plumbing appliances you want to install. Otherwise, at this point, you are finished with bringing pressurized water into your conversion van.
For wastewater, your sink will have a drain valve under which you’ll mimic a residential plumbing system and install a p-trap for waste water to pass through on it’s way to a plumbed grey tank. But if you are borrowing from the minimalist van life playbook when it comes to wastewater, you could simply run the drain directly into a 5-gallon container that you dispose of accordingly.
However, if you are considering a plumbed toilet and/or shower then you will likely want to consider adding a grey tank and determining the location of this tank will be a function both of which conversion van you own (and suitable under-floor mounting options it may offer) and the proximity to the other appliances.
READ NEXT: Check out these great campervan sink options for your van build!
Shower/Toilet Options
If you are going to install a plumbed toilet instead of either cassette or composting toilets then you will need to run water both to the toilet from your water pump as well as out of the toilet into a black tank for proper storage and disposal.
Personally, we plan to save this step by relying on the brilliance of composting toilets for reducing the dependence on both water and waste storage.
When it comes to showers, consider that an indoor shower will require plumbing to it from the water pump as well as plumbing to a grey wastewater storage tank. If having an indoor shower is not necessary, but you’d still like pressurized water for an outdoor shower (even for a hot shower!) then you would still plumb water into the shower from the water pump. However, you would not need to worry about draining the water into a grey tank.
We do appreciate the ability to have a shower on demand regardless of whether we are off the grid or on grid. So we would make having the largest wastewater tank possible a priority. We would have both black water (urine) from our composting toilet and grey wastewater from our shower and sink collected in the tank.
READ NEXT: Be sure to learn more about great campervan bathroom ideas in this post!
Hot Water Heater
If you enjoy hot water – either for dishes or a shower – then you’ll have to integrate a water heater into your plumbing system. This is simple from an inlet standpoint, as you will just continue to branch your plumbing from your water pump into the water heater.
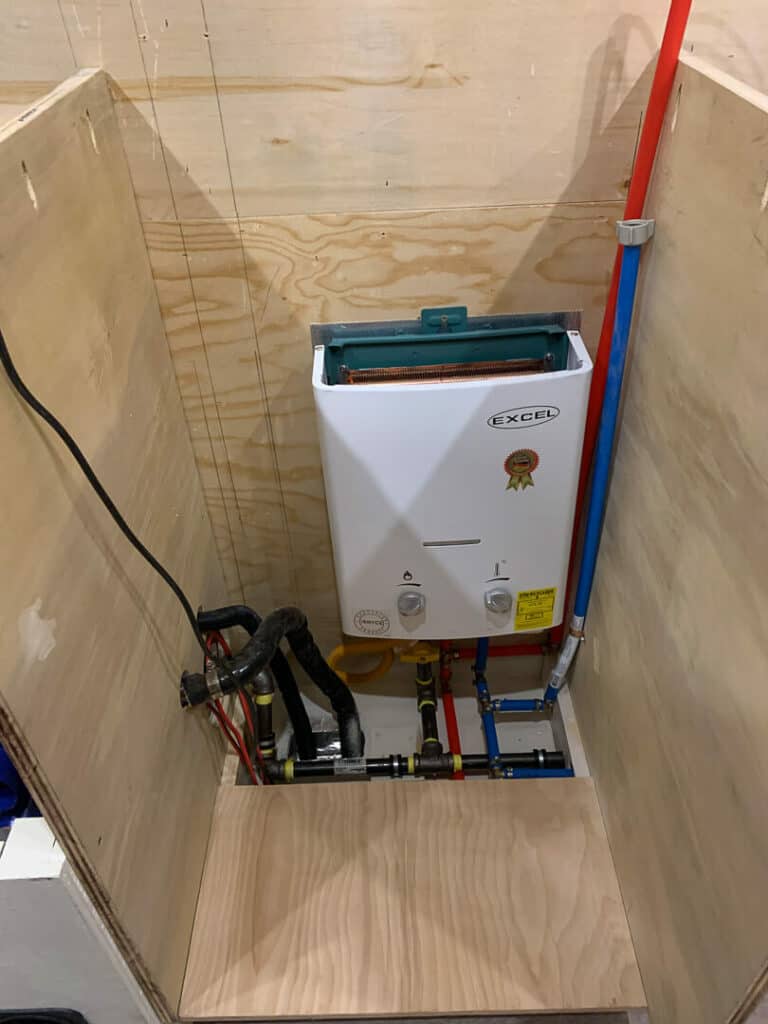
From there, water is heated and will leave the hot water heater through a separate hose or pipe that you can then divert to your shower and/or sink. If you plan to have a robust propane system then you may even consider an on-demand hot water heater instead of a standard one, saving both the space of a heater tank and the time to heat your water.
READ NEXT: Be sure to give our Campervan Water System Guide a read before designing your plumbing!
Propane System
While not necessarily essential in van life, having spent 4 years living in RVs with propane appliances we have come to enjoy the efficiency, low cost and convenience of a propane system. So we will touch on the pros and cons of whether or how you will want to incorporate propane into your camper van build.
Do note that working with your propane system can be incredibly dangerous and this guide is only intended to offer suggestions and advice on planning for the installation of this system. For actual installation be sure to consult a professional if you are not capable or confident in working with propane on your own.
If you want to add a little convenience and conventionality to your DIY camper van conversion then you’ll likely want to install a fixed propane tank inside your camper van. Yes, this is one more relatively large appliance to account for. And there are certainly workarounds to a fixed tank.
But fixed tanks offer more storage and the added safety that comes by reducing the potential for shifting to break pipes and cause leaks or worse. They are not altogether common in the average van build. But they are definitely worth considering since there are several key appliances you may want to connect to run on propane:
- Propane Range (Stove / Oven)
- Water Heater
- Refrigerator
- Furnace / Heater
READ NEXT: Be sure to check out our Campervan Propane System Guide to learn more about designing your propane system.
A Minimalist Approach
A minimalist van life workaround is to not install any of those appliances and instead to rely on either the tiny green fuel tanks on the shelves at your favorite big box store or to carry a removable 20 lb tank that you can either refill or swap out at most hardware or propane stores.
In this case, you’d either have a portable water heater for an outdoor shower or none at all. You’d also likely run your refrigeration off your house batteries and wouldn’t have more than a small, portable propane heater, layers of warm clothing and some thick blankets to protect you from the cold.
As for cooking, you’re headed outside to cook on a camping stove of some sort because it would not be safe to use a larger camp stove indoors with this portable propane tank.
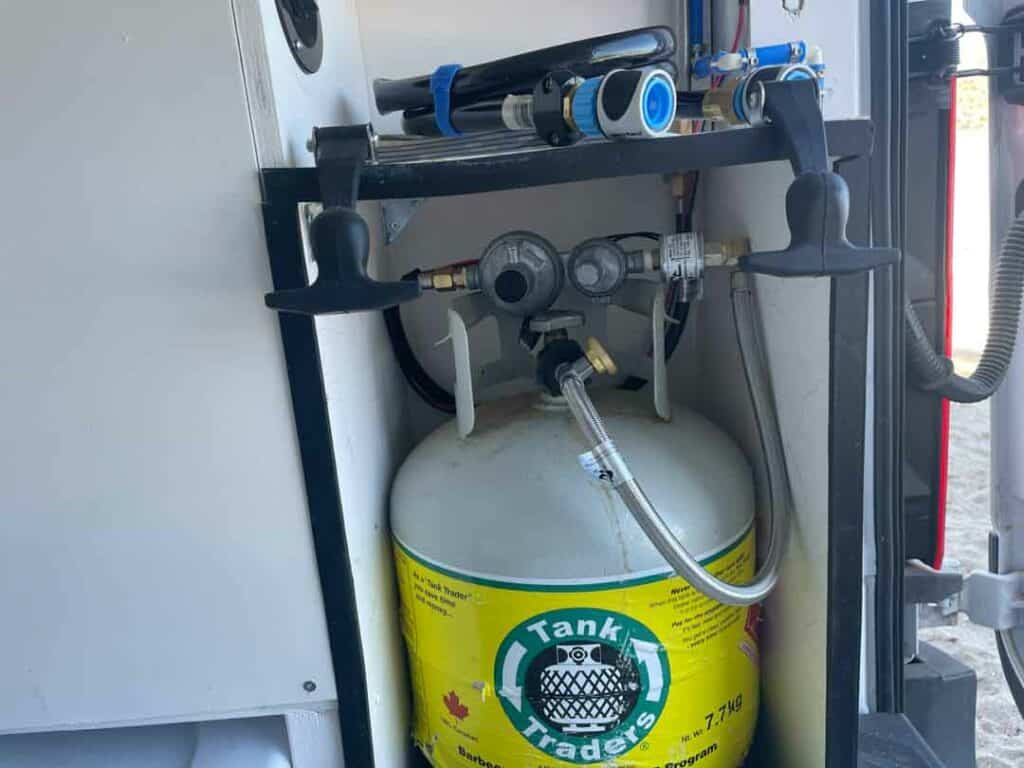
A More Thorough Approach
For improved safety and convenience, you will look for a horizontally mounted ASME propane tank to permanently install in your camper van. You can run copper piping from the tank to each appliance you would like to install.
With this setup, you could invest in a decent propane range stove/oven combo both to cook on the stovetop as well as in the oven. You could also open up your refrigeration options to include 2-way or 3-way fridges. Propane refrigeration is incredibly efficient and keeps temps cooler anyway.
Additionally, you could connect a hot water heater to your propane tank as well as to step up your game by having an outlet you could run a hose to fuel a portable propane fire pit or outdoor grill.
Beginning Your Build – Step By Step Through the Campervan Conversion
Now that you have an idea of what the main systems of your camper van conversion will be, let’s get into more of the processes you will need to address when building your van.
Starting with the Insulation, Framing and Wiring
At this point in your van build you are ready to actually start building your new tiny home! You’ve already picked out and purchased the van and you have an idea about what appliances you want and where they will all fit together in your awesome floor plan.
Hopefully, you’ve started to assemble all of the appliances, tools and hardware to get started. So let’s get into the process of building out the cargo van!
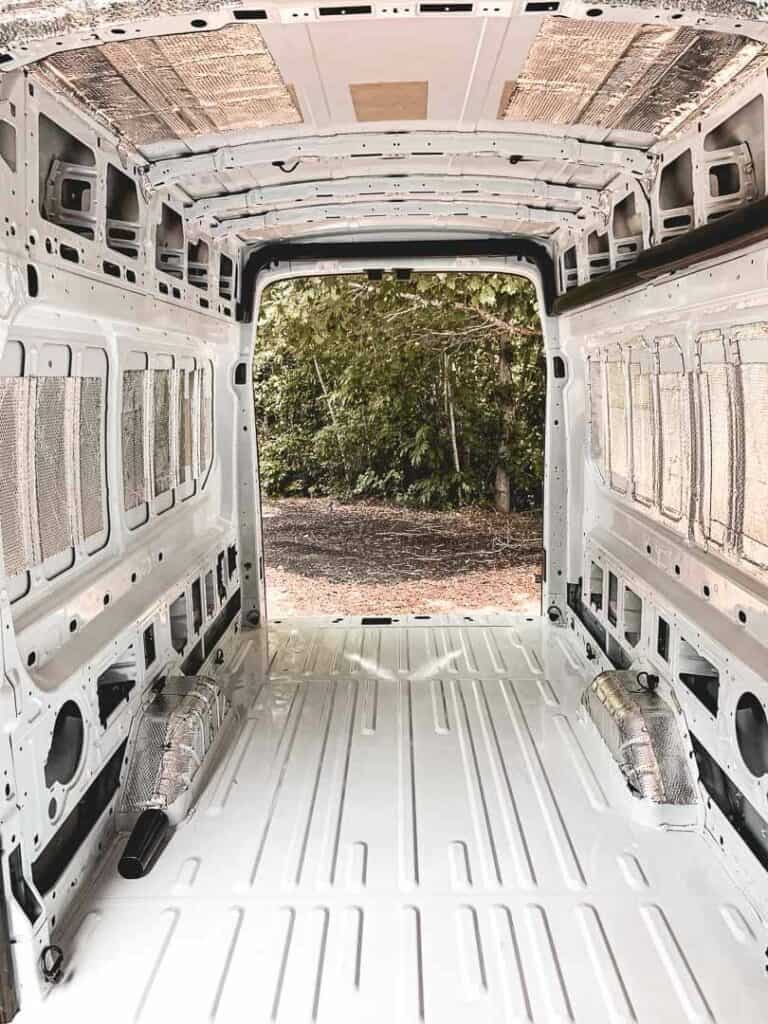
First things first, if you haven’t already done so you’ll want to strip down the van to the bare floor and walls. You can skip this if you’re van is already stripped down out of the factory. Otherwise, get to work peeling back any layers that will stand in the way of adding your wires and insulation.
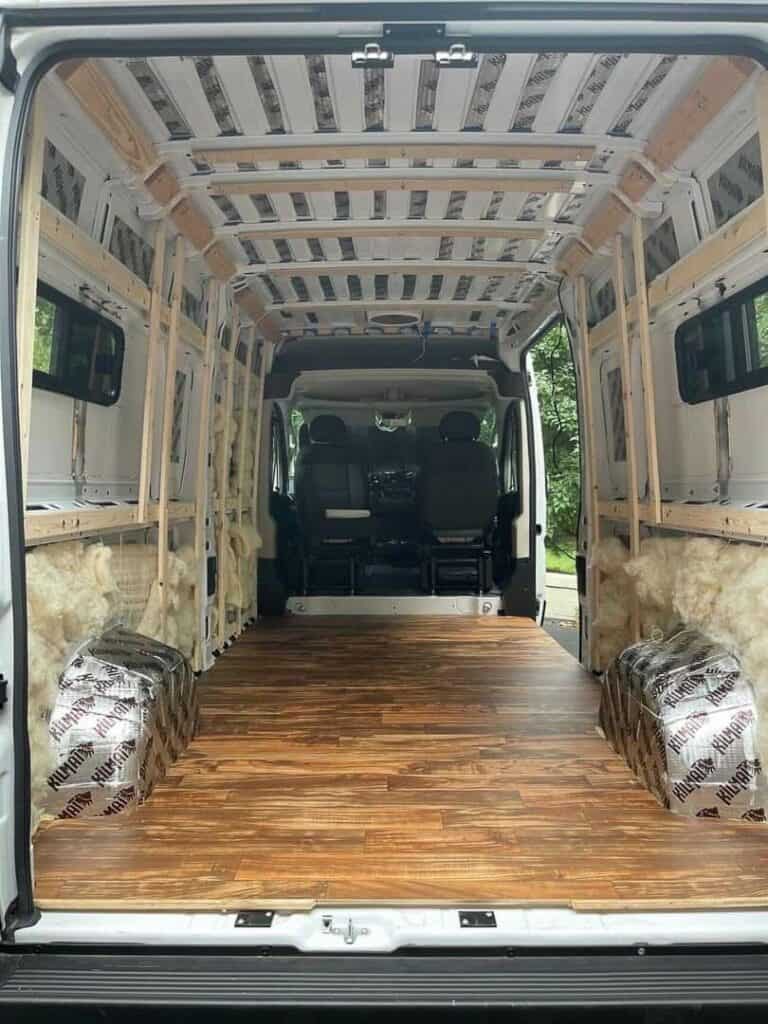
Framing
If you have an idea of the layout for your van, this is where you’ll start to frame out your build using the bare floors and walls as the foundation for your build. Most people use 2×4 and 1×4 wood planks for the framing.
This step will take a while and depending on which van you chose, you may have some curved walls to work with. This is where the Dodge Promaster stands out due to its “boxier” cargo space.
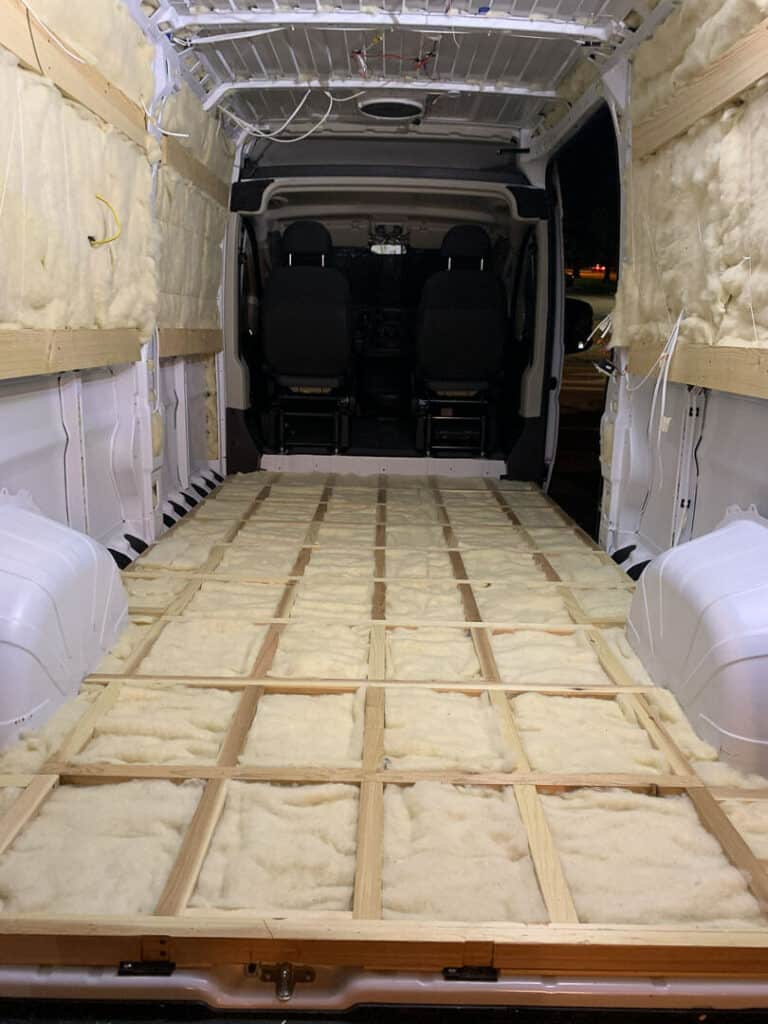
Although, in general, it is important to run your electrical wires before you add the insulation, when it comes to the floor as the foundation for your build, you may want to go ahead and give the floor some attention at this point. Most people will use some kind of plywood for the subfloor and may use more or less insulation depending on how winterized they want their van.
If you’re installing a grey water tank or a propane heater beneath the van, for instance, be sure you have at least cut the holes in the right place before adding the subfloor. You can always cut through after the subfloor. But it could be easier to have the holes in place as you insulate and lay down the subfloor.
Run Electrical Wiring
Before insulating the sides and ceiling of the van, you’ll want run all of your wires and have all of your switches and outlets figured out. If you don’t run the wires before you lay the insulation then the wires will butt up against your siding (likely wood) and there is a greater chance that you will puncture or rub through the wires when installing the siding. So be sure you have a great electrical plan in place so you can run your wires accordingly.
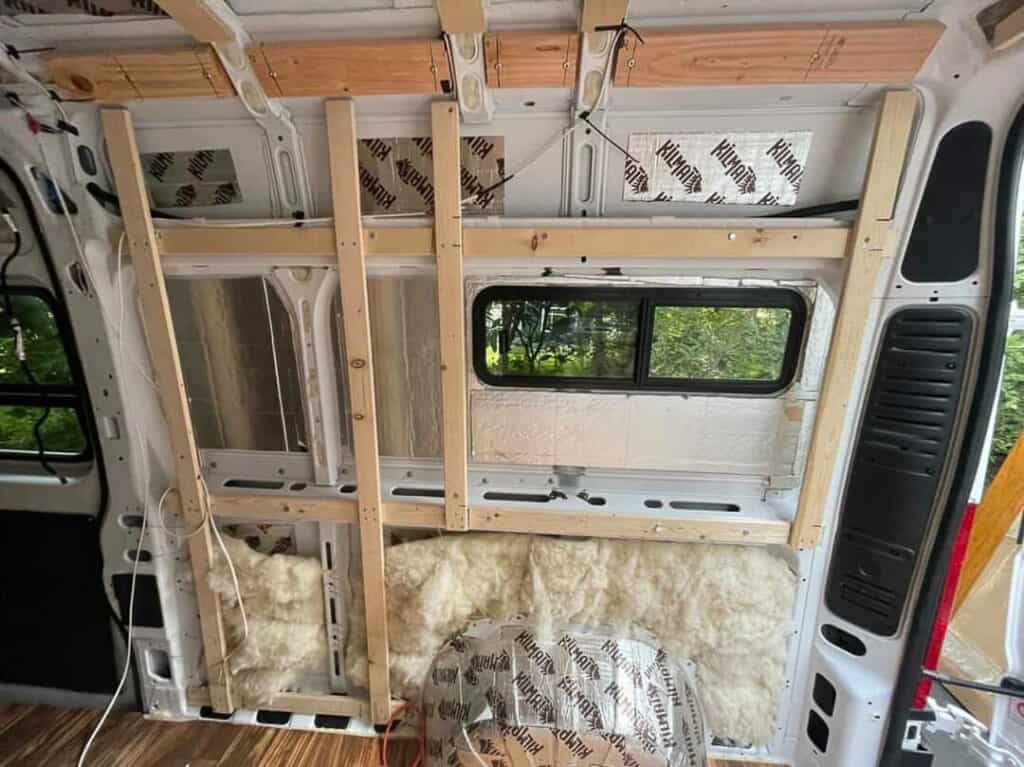
Add Insulation
Once you’ve got the van framed and the wires run, there are a few types of insulation from which you can choose. Havelock sheep’s wool is by far the most preferred insulation among most people who build their own vans.
Sheep’s wool is an all-natural and eco-friendly material that dampens sound, controls moisture, resists fire and is quite easy to install. If you’re building with your own health in mind, there is no off-gassing as there are no harmful materials in it.
3M Thinsulate is a second favorite and is a synthetic material that mimics the properties of wool. Moisture wicks down it so it does not build up. It is non-toxic and can be installed relatively easily with a spray adhesive.
And whether you just need to insulate hard-to-reach places or are incredibly ambitious, you can opt for spray foam as a third option. Spray foam, like this can of Great Stuff, is great insulation. However, it is expensive, challenging to install and can be messy.
You may end up with a combination of different kinds of insulation throughout the van. And you may add more or less insulation to the floor depending on your goals and how much standing space you want left over once you add the subfloor, floor and ceiling.
Vent Fans, AC Units, Bump Outs, and Other External Considerations
Depending on your van design, you may want to include a vent fan (or two), air conditioning units, bump-outs or other external appliances or adaptations. If so, you will probably do these before the framing and insulation.
Knowing where these appliances will be installed will help you know how much insulation you need and will also allow you to tuck the wires for each appliance beneath the insulation in the walls and ceiling.
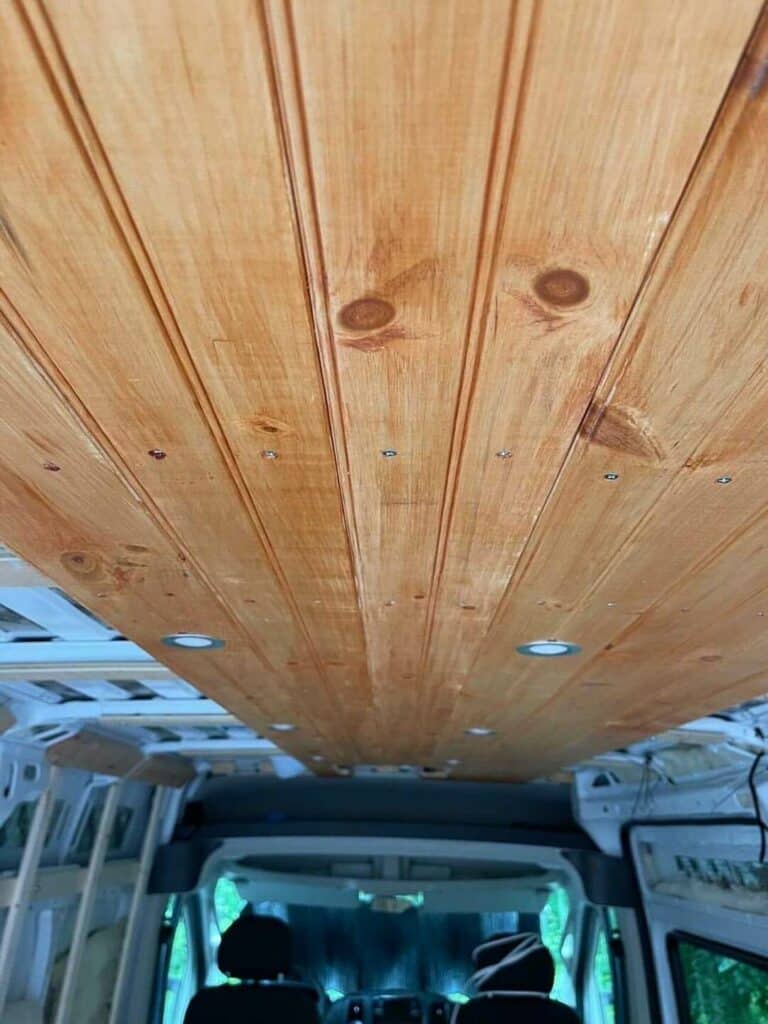
Siding and Ceiling
With the van now framed, wired and insulated it’s time to get into putting up the siding and ceiling. We’ve met some van dwellers who decided not to install siding in some places where they planned to install things like cabinets and appliances.
However, it’s recommended that you plan to add siding and ceiling panels throughout the entire van. Things change and it’s a lot easier and cost-effective to install the walls and ceilings upfront.
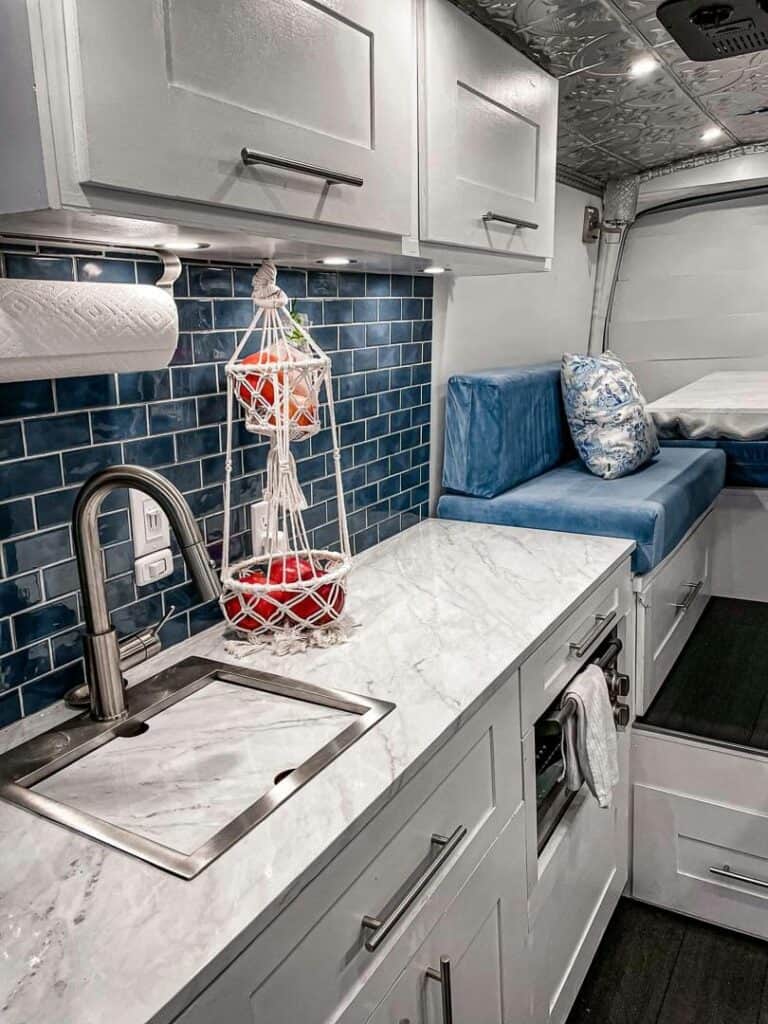
When it comes to walls and ceilings, you can mix materials or add accents wherever you see fit. Most people choose to use shiplap panels to match their walls and ceilings. But some people will do some mix and match, like Lauren and Jon who added a unique tin tile ceiling to their van.
Keep in mind any holes for vent fans, wires or other appliances you’ve installed on the roof. And you’ll also want to install your ceiling lighting as you add the ceiling to the van.
Van Flooring
With the siding and ceiling done, you can add your final flooring to the van. Some people will wait until they’ve built everything out and then add flooring only where it is visible in the van.
But, again, we feel like the best job is one in which you put your flooring throughout the whole van and then build your furniture and appliances on top of it. That way if and when anything changes you don’t have to redo the floor. But it will save time and a little money if you save the flooring until the end.
Whichever way you decide to go, most people opt for luxury vinyl plank flooring. Although it is a little heavier and more expensive than peel-and-stick or vinyl sheet, it is typically waterproof (or at least water-resistant), incredibly durable and will add an additional layer of insulation to the floor. It is relatively easy to work with and install – we’ve used it in every remodel we’ve done.
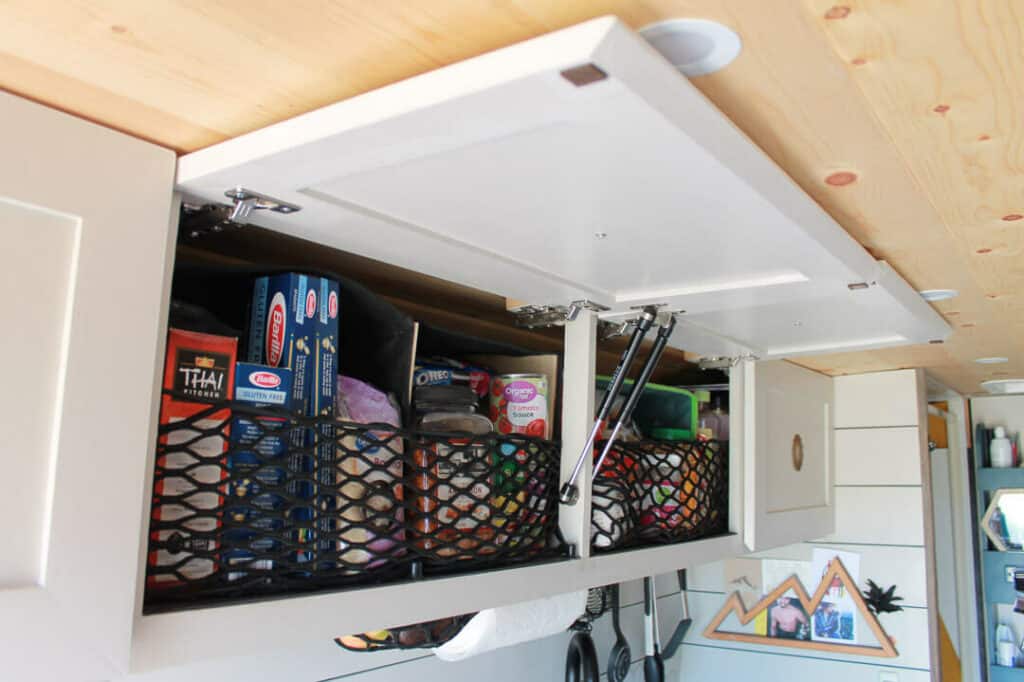
Add your furniture, cabinets and appliances
With the van framed, wired, and insulated and the walls and ceiling in place, you can start building out the furniture and installing the appliances you’ve selected for the van. From building your bed, sofa, shower, kitchen, cabinets and/or office area there will be lots of specific designs you’ll have to put in place to complete your van build.
You’ll also install your plumbing system and any appliances such as a shower, faucet, hot water heater and water pump that will go with it. If you’re plumbing in propane you may have done so during the framing process. Otherwise, this is where you’ll run the lines and install the propane appliances.
Finishing Touches
The finishing touches step will be ongoing from this point forward. Whether you’re adding trim, painting cabinets, hanging pictures or decorating, there are lots of finishing touches to turning your van into your comfortable home on the road.
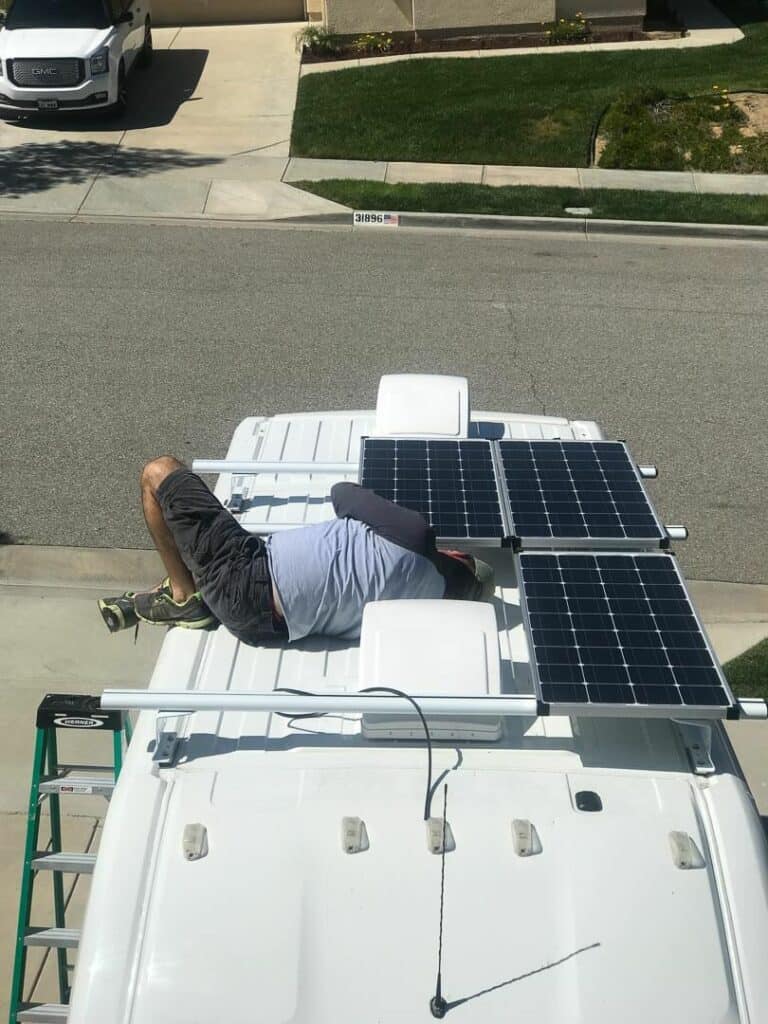
Don’t Forget the Solar System
We have seen very few camper vans without some form of solar. So at this point in your build (and likely a few steps earlier when you were cutting holes in the roof and installing vents), it’s time to account for your solar.
The most common and popular way of installing solar is by adding a roof rack of some kind onto which you mount the solar panels. You can install either flexible or standard solar panels directly into the roof of the van.
Or you could opt for a portable suitcase solar system that requires no mounting to the roof. Whichever way you choose, we highly suggest you invest in a decent solar system and a robust battery bank to make life on the road much more enjoyable.
READ NEXT: Don’t know where to begin with solar? Check out our guide for building the perfect campervan solar system!
Maximizing the Whole Van: Using the Exterior Walls and Roof
One last consideration with your van build is the outside of the van itself. Here you can add ladders, solar showers, storage boxes and racks for bikes, boards, kayaks other outdoor activities.
Some people, like our friends Lita and Dylan, will build a rooftop deck to enjoy sunrises and sunsets more. Whatever you decide to add to the outside of your van, be mindful of the additional weight and where it is distributed.
We’ve known people who have become too top-heavy with a massive solar shower setup and others who have lost bikes and entire bike racks off the back of their van because of improper weight distribution.
Final Thoughts on Building A DIY Camper Van
While this post is just a comprehensive resource to help you identify all of the steps you will need to consider when building your DIY camper van, we hope that it has helped you outline your dream van.
The devil is in the details, so they say, and there are a lot of details beyond the things we’ve covered here. So on to the next step of deciding all of the great features you want in your perfect camper van!
This post may contain affiliate links. That means if you make a purchase a product we recommend using the links in this article, we may receive a small commission at no extra cost to you. We promise to use this pocket money to buy lots of coffee and fuel for the campervan to keep us enjoying #VanLife for just a little longer. We appreciate your support, and only recommend products we know and trust. Thank you friends!