Building and installing a van life solar setup is not terribly difficult or expensive. If you’re looking for information on how to build a solar system for your campervan you’ll find everything you need in this post!
In van life, there is nothing like complete independence from any utility you would find in a brick-and-mortar home. After all, much of the reason why many of us choose van life is to escape the confines (and bills) that come with a house, condo or apartment.
This is called living “off-grid” and can be achieved relatively easily and affordably with considerations for your campervan water system, propane system and electrical system. Part of your electrical system may involve the addition of a solar system.
When solar technology was first developed it was expensive, inefficient and complicated to install and set up. But twenty years into the twenty-first century solar components are affordable, efficient and mostly plug-and-play.
We’ve installed and upgraded numerous solar systems in over four years on the road and we’re excited to help you understand the basics of what you need to consider when planning for solar in your van.
Like the other core systems, proper planning will save loads of time and money when it comes to the installation of your solar system on your van conversion.
We’ll take you through every step of the process and do everything we can, short of climbing up on your roof rack and hooking up the panels ourselves!
DISCLAIMER: Building a solar system in your campervan can be intimidating. We definitely recommend that you consult professionals for anything you do not fully understand or need help with on the installation. This post is intended to give you the outline and basic guidelines for how your solar system works, what components you need to consider including in your setup and the basics of how to install these components. It is not intended to be an actual guide or installation manual as we are NOT electricians.
Solar Power Options on a Budget
We’ll go into more detail in the post below to describe each of these components that you need to consider when designing and installing your van’s solar system.
But we want to give you a few ideas of different versions you could use as the framework for your van’s solar power needs based on your budget.
SPECIAL RENOGY DISCOUNT DEAL: CLICK our link below FOR YOUR PURCHASE and Don’t forget to use “VanLifeTheory” at checkout for 10% off all Renogy Products, AN EXCLUSIVE DEAL WE’VE NEGOTIATED JUST FOR VAN LIFE THEORY READERS!
Bare Bones Van Solar System (Under $1,000)
You likely won’t want to leave on a road trip of any duration without adding solar power to your van. So at the bare minimum, we’d recommend you consider this as the basis for a bare-bones approach to solar power in your van.
- 100W fixed rigid panels or flexible solar panels
- + 20 amp PWM charge controller
- 140 Amp Battery Isolator
QUANTITY | COMPONENT | FULL PRICE | CHECK DISCOUNTED PRICE | |
 | 1 | $340 | ||
 | 1 | $110 | ||
 | 1 | $280 | ||
 | 1 | $220 |
This will give you the ability to slowly recharge your battery bank – whether you consume only a little power or if you have alternative ways to charge your battery (alternator, shore power, generator).
You could also opt for a portable suitcase panel option if you did not want to mount solar panels on your van. But while these offer some advantages, they are less efficient and you have to lug them in and out every time you want to use them.
Middle of the Road Campervan Solar System (Under $1,500)
If you’re looking for a middle option to upgrade your solar to something more reasonable without blowing out your budget, this is a setup that we’d recommend you consider investing in.
- 200W fixed rigid panels or flexible solar panels
- 40 Amp MPPT charge controller
- 140 Amp Battery Isolator
- Connected in parallel
This leaves plenty of room to be able to add solar panels later if you decide you need more power delivered back into your batteries.
QUANTITY | COMPONENT | FULL PRICE | CHECK DISCOUNTED PRICE | |
 | 1-2 | $225 each | ||
| 1 | $130 | ||
 | 1 | $490 | ||
| 1 | $230 |
The Ultimate Van Life Solar System (Around $3,000+)
Now we’re outlining what we think would be a pretty awesome solar setup for van life if you have high energy consumption and/or if you don’t want to ever think about how much electricity you need (or having to plug into shore power) again.
- 300-400+ watts fixed panels (rigid monocrystalline panels)
- 30-40 amp MPPT charge controller
- 40 amp DC-DC Charger
- Connected in series-parallel
- With the ability to add a portable solar input to your system so you can have the option of adding additional solar potential later.
QUANTITY | COMPONENT | FULL PRICE | CHECK DISCOUNTED PRICE | |
 | 2 | $950 | ||
 | 1 | $190 | ||
 | 1 | $600 | ||
 | 1 | $349 |
Note that with this system you could go even bigger from the base. We’ve seen vans with solar panels mounted both on top and on either/or/both sides of their van. And we’ve seen others with their entire roof covered to the brim with tilt-mounted solar panels.
Knowing our above-average power consumption and our desire to always have enough power without having to worry about it ever again, we wouldn’t plan to hit the road with less than this 400W/40 amp MPPT controller option.
Camper Van Solar Setup – Understanding Van Life Solar
It is important to note that in this post we’re going to introduce you to the big picture of solar power to break things down on the macro level. And we’ll take a look at some important terminology rather than map out a specific solar panel array for your van.
That is because every van setup requires a different approach, and we’ll link you to some great resources for digging into the specifics. The goal here is to help you understand the particulars of every step of the process so you can apply this knowledge to your own rig.
By the end of this guide, you’ll know about how solar cells soak in the rays, how much power you need to reach your maximum battery capacity, how many solar panels you’ll need to get there, and will have met all the electrical components necessary to make it happen.
How Does A Campervan Solar Power System Work?
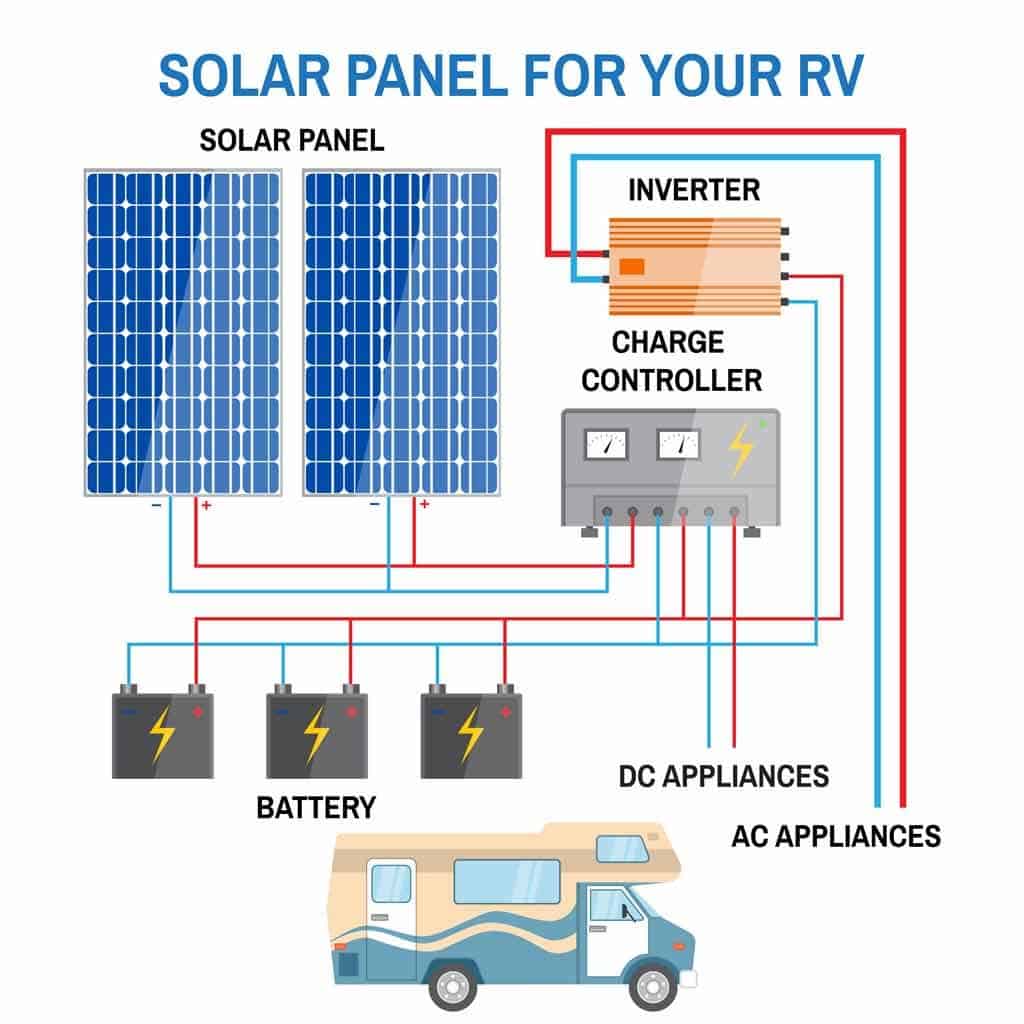
Van solar panels work a lot like photosynthesis in plants. To create endless power, your campervan solar system will need several key components:
- Solar Panels
- Solar Charge Controller
- Wiring & Lugs
- Fuses and Breakers
Solar Panels – Solar panels are typically rectangular in shape and made up of a combination of glass and metal. As sunlight reaches the solar panel it absorbs the radiation and converts it to usable energy that can be transported into your van.
As with all power, this transmission contains the energy of a particular voltage and amperage. You can manipulate how much voltage and amperage reaches your battery through the use of a charge controller.
Charge Controller – A charge controller is connected both to the solar panels and the battery bank. As such, it acts as a “middleman” in the process.
It accepts the energy transferred through wires from the solar panels and delivers this to the batteries in an amount and force that protects the battery’s health. And it also acts as a barrier to prevent energy stored in the battery from flowing to the solar panels at night.
You will need to have these 2 components in order to safely and effectively harness energy directly from the sun. But you will also need various wires, fuses and wire terminals to connect the system.
You will find information about all of these components in the section below.
Solar systems work as follows:
First, energy from the sun comes in contact with a solar panel. The solar panel absorbs the radiant energy and converts it into 12-volt electricity.
Next, this electricity flows through wires to the charge controller. The controller evaluates the battery’s state of charge and determines how much solar energy is required and at what force. It will then change either the voltage and/or the amperage of the solar energy to feed the battery accordingly.
Finally, the usable amount of solar energy is delivered to the battery from the charge controller. Excess energy not needed in the battery is redirected back to the solar panels to be returned to the atmosphere as heat.
Your battery bank can then use that energy for everything from keeping the lights on to sponsoring movie night, depending on what capacities you use in rounding out your solar power system.
How Much Solar Power Do You Need?
How much solar power you need depends on your specific power demands throughout the day (and night!). So before you start drilling holes in the roof, you should probably have a solid estimate of what you need your campervan solar system to be capable of.
When it comes to solar panel work, you have to make a few conservative assessments of how much sunlight you’re going to find. If you are looking for a robust power system for full-time living and you want to remain off-grid indefinitely, you should make sure your solar system can supply your power needs through a rainy week.
You should start with getting an idea of your daily energy demands at maximum power draw. We can’t tell you your specific needs, but as a baseline, we always recommend reaching for a system that can easily supply at least 300 amp hours per day.
If you want to get really finite, this post is the best to help you gauge your exact consumption desires.
Solar Panels are measured in Watts (W), which is a measurement of power. So you will find the best solar panels will likely start around 100W and be rated as high as 200W or 300W. This means they are capable of producing 100W of power in ideal conditions.
Battery capacity is measured in amp hours (Ah), where amperes or amps are a way of measuring the rate of flow of power. One common battery size is 100 Ah. This means that the battery can discharge at a rate of 1 amp per hour for 100 hours, or 2 amps per hour for 50 hours, etc.
The relationship between the two is described in the formula: Power (W) = Voltage (V) x Current (amps).
In a standard campervan electrical system, it is most likely that you will run on 12-volt power. While you will actually have a little over 12 volts, the idea holds that a 100W solar panel in ideal conditions will provide a current input of 100W / 12V = 8.33 Amps.
If the sun provided that same amount constantly for 10 hours then you would have 8.33 Amps x 10 hrs = 83.3 Amp hours. Of course, this is oversimplified just for example. The sun will never provide that constant rate for that amount of time.
However, if you considered that you only had this single 100W solar panel and the sun did provide constant power for 10 hours, you could expect to be able to use this 83.3 Ah to power all of your electrical wants and needs in your van.
So to get an idea of how much power you need to replace each day using your solar panels, you need to have an idea of how much power you consume throughout the day. This handy solar calculator is the closest you’ll get to a professional estimate without shelling out a few dollars for an expert to come to town.
You’ll need to collect the wattage (or Amp draw) of everything you plan to power throughout the day and have a general idea of how many hours a day you’ll use each device. Be sure to budget for excess so your lights won’t go out on your darkest days!
And don’t forget that you’ll often use more electronics on crappy days. Rainy days in the van lifestyle are perfect for Netflix in bed, creating a terrible combination that is a double draw of low (or no) energy coming in and max watts going out.
It’s always a good idea to leave room for growth in your electrical setup. But you will be limited in how many panels you can put in your solar panel array by the size of your roof and if you have a roof deck or other storage up there.
And we always advise investing in the largest lithium battery bank you can fit and afford because then you can really hold out on the most overcast of days.
If you don’t want to bother with the calculation, gather up 400 Watts of solar panels, a robust solar charge controller, and 400 Ah of battery storage and you’ll spend the next decade without worrying about how to generate electricity.
What Solar System Components Will I Need?
Before we get into tips and tricks for wiring solar panels, we’ll cover the essential components that you will need for your solar power system.
Apart, each one of these components isn’t very much. But together – and with a bit of help from the sun – they’ll create limitless power.
Solar Panels

Cable Entry Gland

Charge Controller

Fuses

Mounting Brackets

Branch Connectors

Solar Panels
Step one is attracting the sun. Solar panels can come in a few different varieties, energy levels, and flexibility rankings, which we will explore further in the next section.
Solar panels are made up of individual solar cell clusters that work together to harvest energy from the sun. The larger the wattage of your solar panels, the quicker you’ll be able to charge your batteries.
Most camper van solar power systems will include anywhere between 100W – 400W with very few systems exceeding 400W. This is in part because of the room required on the roof as well as the fact that van electrical systems tend to be small and you won’t necessarily need more than 400W to recharge your batteries.
Read Next: Check out this post to learn more about solar panels and get our best picks for your van!
Solar Charge Controller
Once your camper van solar panels have collected the energy from the sun, you will move that energy through wires toward your solar charge controller.
A standard solar panel just isn’t capable of properly communicating with your battery bank. And, in fact, if you wire your solar panels directly to your battery bank you will do your batteries great harm!
A solar charge controller is there to mediate the transfer of energy from your roof rack to your power system, as well as provide you with a wealth of information that helps you keep on top of the health of your solar array.
It is critical that you have a great charge controller because it will communicate with your battery bank to know the power needs and state of charge and will deliver the solar power from the solar panels at a rate that is healthy and safe for the batteries (and you!).
For example, in continuing from the 100W solar panel example before, if your batteries are charged or nearly charged then adding 8.33 amps per hour may be overkill for your batteries. In this case, the charge controller communicated with the solar panels to dissipate the excess energy on the roof rather than overcharging the batteries.
You may be tempted to invest more in your solar panels than in your charge controller, but your efficiency is more affected by your charge controller than by any single solar panel. So we encourage you to spend a little more on the best solar charge controller because it does most of the work of any component in your power system.
Read Next: Learn more about what to look for in the best solar charge controllers in this post.
Battery Bank
All of the energy that your solar panels harvest is stored in your battery bank, also known as your leisure batteries. There are three common choices: Standard flooded lead acid batteries, AGM batteries, and lithium-ion batteries.
We don’t recommend that you consider standard flooded lead-acid batteries. Although they are the most affordable, they are also the most dangerous and require the most maintenance.
Lithium-ion has earned recognition as the most efficient choice for campervan solar, but they are also the most expensive. Regardless of the cost, we advise you budget and plan for lithium batteries as these are becoming almost standard in most DIY campervan builds.
If you want a great look at the main differences between AGM and lithium batteries check out this post.
Your solar kits are irrelevant if the battery capacity doesn’t match your solar panel’s usable capacity, so make your choice based on your power needs. For example, 400W of the solar array will more than likely be overkill for a 100 Ah battery bank.
Read Next: Check out this post to find out more about what to look for in the best campervan batteries!
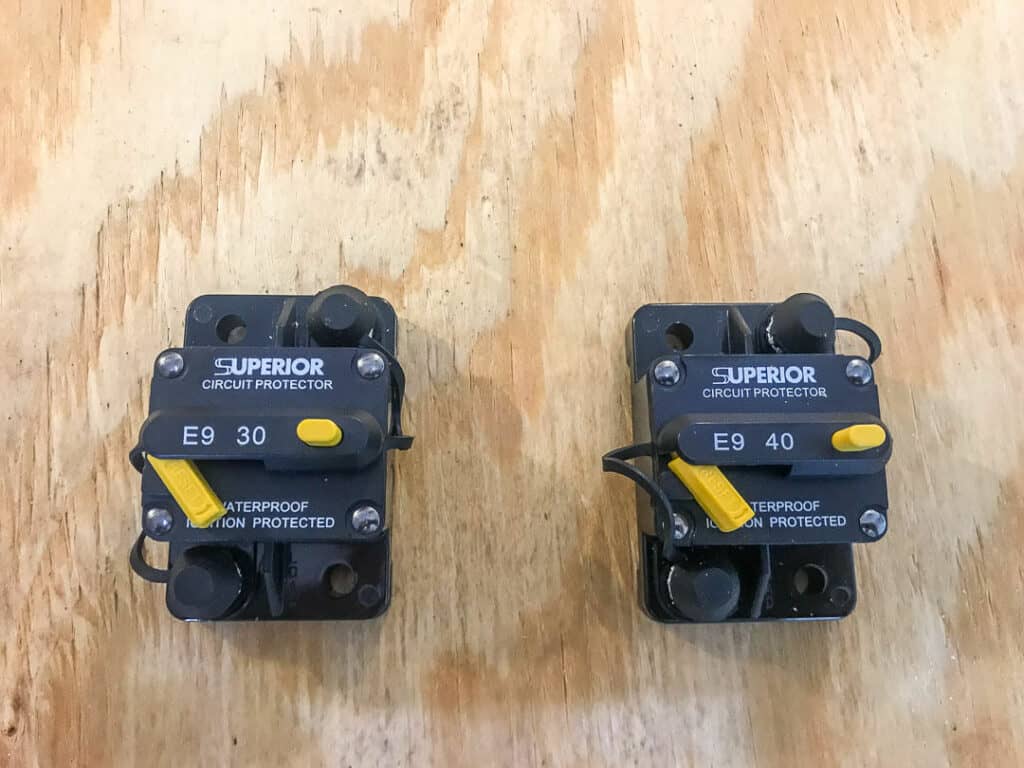
Fuses And Surface Breakers
Fuse and/or surface breakers come in handy if you ever wind up with more solar power than you can deal with. They both act in the same manner, essentially as kill switches fixed into your wiring that protects from overheating or overloading any appliances.

If too much power surges through the wires, it will “break” the wire in the fuse or “trip” the breaker. This opens the circuit and prevents more power from flowing through the system.
In-line fuses, those that connect directly to the wires of your solar system, will be a mandatory component that you will need to put on the positive wires between your solar panels and your charge controller.
You may also invest in surface breakers between your charge controller and your battery bank as well as in line with other important electronics such as an inverter in order to protect the device.
Any electrical system needs fuses and/or breakers to safeguard your battery, electronic devices and solar system from an electronic overdose.
Buss Bars

Your whole campervan electrical system will likely be a little complex by the time you run wires for lights, vans, outlets and other electrical appliances.
Rather than creating a “bird’s nest” of wires all over the place, buss bars are used to consolidate heavy electrical loads.
Busses help funnel all the negative wires to one place and all of the positive wires to another place to protect your battery while pumping extra power where you need it.
You’ll likely invest in a set of these because you will ultimately connect your charge controller to your battery bank with wiring that runs through a buss bar.
Wiring and Lugs
In order to transfer energy that the camper van solar panels collect to the charge controller and from the charge controller to the buss bar/battery bank you will need to have the correct size and length of wire between them.
With wires, however, one size does not fit all. Wires that are too thin can melt and cause a fire if too much current is passed through them. And wires that are too thick will result in power loss transferred through the wires.
Using a resource like this wire calculator is great to help you determine exactly what gauge wires you will need for various lengths throughout your campervan electrical system. Of course, you’ll need corresponding lugs to connect all of your electrical components accordingly.
Solar Panel Basics
Solar panels are made up of solar PV cells, and a variety of materials that protect those cells while they go to work, including silicone, metal and glass.
Metal and glass are standard issue protections that you’ll find on any kind of solar panel. But the silicone used helps define the different types of solar panels. There are three main categories: thin-film, monocrystalline, and polycrystalline solar panels.
Any type of solar panel can work with a van. But it’s not always easy, especially on smaller vans without much roof space. Today we’ll focus on mono and poly panels, as the thin-filmed panels are not yet found in mobile homes.
SPECIAL RENOGY DISCOUNT DEAL: CLICK our link below FOR YOUR PURCHASE and Don’t forget to use “VanLifeTheory” at checkout for 10% off all Renogy Products, AN EXCLUSIVE DEAL WE’VE NEGOTIATED JUST FOR VAN LIFE THEORY READERS!
Monocrystalline Solar Panels
This type of solar panel is made up of one singular silicone crystal that is cut down to fit a mold. The technique wastes quite a bit of silicone but results in a pure crystal that can convert more energy than polycrystalline.
That means monocrystalline solar panels are both the most efficient but also the most expensive model. It’s the safest choice for solar power, but it still doesn’t cope well with partial shade.
Polycrystalline Solar Panels
Conversely, a polycrystalline solar panel is the result of several bits of silicone melted down to fit a mold. There are a few perks to this practice, mainly your ability to harness all of the silicone. But there are also several downsides.
Polycrystalline solar panels aren’t as efficient at converting energy as monocrystalline solar panels, and they have a lower heat tolerance, which is a particularly essential flaw in a solar panel.
In the long run, the best solar panels are almost always monocrystalline, which can provide more power given the same amount of sunlight. Polycrystalline performs slightly better when faced with some shady sections, but not enough to be a serious consideration.
Unless you are installing solar panels for emergency use only, you should seriously consider an extra upfront investment for the good stuff.
The other critical decision you’ll have to make is what kind of physical shape you’ll want your solar panel to take.
Polycrystalline Solar Panels vs Monocrystalline Solar Panel
When it comes to the decision between a polycrystalline solar panel and a monocrystalline solar panel, we believe that you will want to look exclusively at monocrystalline panels.
A monocrystalline solar panel is more efficient and has become the industry standard when it comes to traditional solar panels in a van solar power setup. They have a black color (as opposed to a darker blue) and can typically collect a larger amount of solar energy in a much smaller space than polycrystalline solar panels.
READ MORE: Check out this post to learn more about the specifics of campervan solar panels.
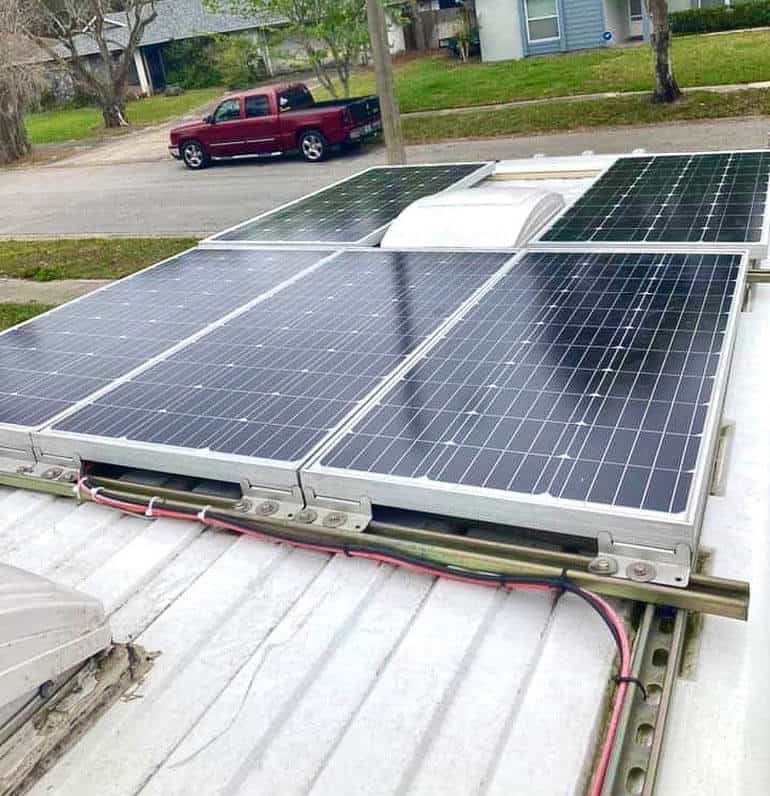
Rigid solar panels
Rigid solar panels take a set-and-forget mindset to solar power. They’ve been around for decades and have proven themselves more than capable of performing for decades as durable van solar panels.
Rigid, fixed solar panels come with corrosion-resistant aluminum frames and tempered glass that packs loads of highway wind speed resistance. You can either install them in rigid brackets that always face upwards or in an angled bracket solar array that can be tilted to face the sun.
If your solar power system can easily fit on your roof and your chassis can handle the weight, rigid provides the most efficient output at the lowest cost.
The main consideration against a rigid solar panel is the installation process, which involves drilling holes in your roof. It’s certainly not ideal, but after a few hours spent rooftop, this proven solar setup is the safest bet for long-term energy.
flexible solar panels
In the beginning, we talked about the technological advancements that have made camper van solar more accessible than ever, and flexible solar panels might be the greatest proof yet.
Solar panels have long required a rigid casing to stay protected through winds, rains and the grit of the road. But now campers have more flexibility than ever.
A flexible solar panel can bend up to 248 degrees, weighs significantly less than a rigid panel with similar output, and lies less than 1 inch thick, making them absolutely perfect for stealth campers.
One of the first things people look for when trying to snuff out sleeper cars is vent fans and van solar panels, but you’d have a tough time spotting flexible solar panels without climbing on the roof. That same petite stature makes them a great choice for vans that have a high enough clearance without adding an extra few feet of solar panels up top.
Another key perk of flexible panels is the installation process, which generally involves adhesive tape or industrial glue. But while it is great to upgrade your electrical system without drilling any new holes, there is a legitimate risk of these flexible panels not standing the test of time, especially when pitted up against the wind.
Therefore, we only recommend flexible panels for stealth vans, teardrop campers who need to keep the weight down, or anyone who doesn’t have tons of free roof space.
Rigid Solar Panels vs. Flexible Solar Panels
One final decision to make about solar panels is whether you want rigid solar panels or flexible solar panels. Rigid solar panels are as they seem. They are firm, sturdy and typically constructed with a thick aluminum frame.
On the other hand, flexible solar panels are thinner and more lightweight. Flexible solar panels are often more affordable and they can fit the curve you may have on the roof of your van a little better than rigid solar panels.
But most people in van life opt for more durable and efficient rigid solar panels. They are a little bulkier. But their higher efficiencies and the fact you don’t have to worry about whether or not they can survive adverse weather make up for it in the long run.
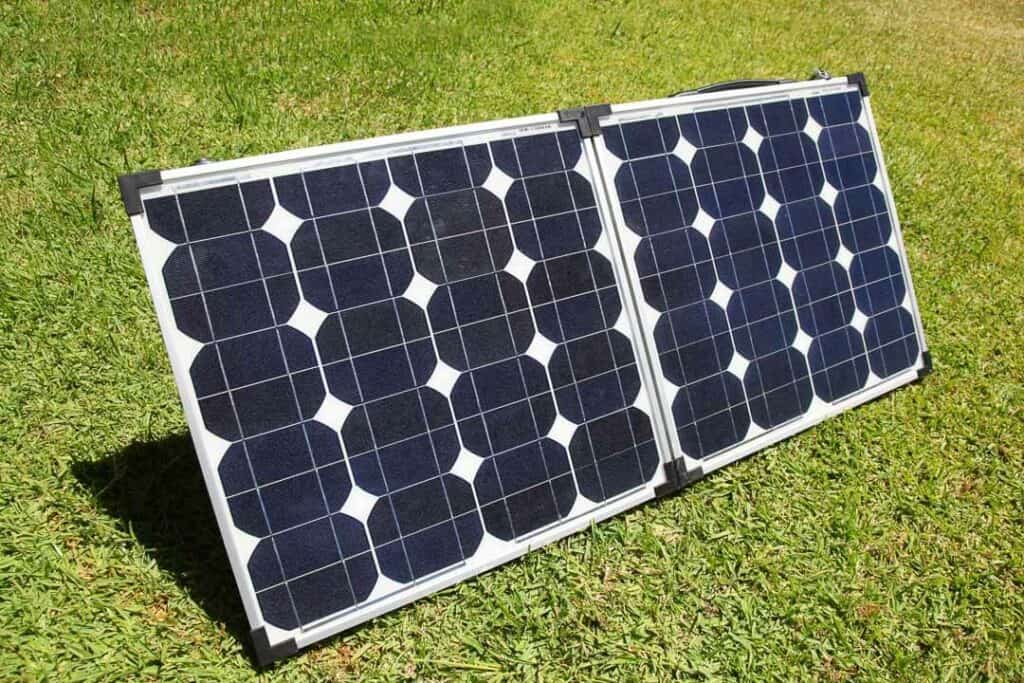
portable solar panels
If you just want a few hundred watts of solar panels and don’t mind setting the panels up each time you want to use them, portable solar panels are a great option. This style of solar panel will fold up like a suitcase and reduce in size enough to stow away nicely in the back of your rig until deployment.
The largest perk of a portable solar install is their lack of an installation! All you’ll have to do is run a wire from the positive terminal and negative battery terminal, ideally with some sort of connection that permanently sticks to your battery without being permanently connected to your solar system.
Once you hit camp, you can bring out your solar panel in direct sunlight while keeping your van in the shade, which is absolutely crucial to get through a hot desert summer with your refrigerator intact.
Unfortunately, even the best solar panels that can be portable will stay pretty heavy and take up a decent amount of space relative to the boost they bring to your electrical system. If you go for the portable route, you should consider a solar panel that is both flexible and portable to make sure it’s still easy enough to move around.
Fixed vs. Portable Solar Panels
You’ll also want to decide between fixed versus portable solar panels. Fixed panels are most common and you will see numerous vans with solar panels permanently mounted on their roofs. But portable solar panels offer advantages too.
A fixed solar panel setup is efficient, sturdy and can endure brutal weather conditions making them a popular choice. But they do require some additional steps in the installation. And if you ever want to swap them out later it may be more difficult depending on the dimensions and how you have mounted them.
On the other hand, portable panels typically come in solar kits where they fold out and can be propped up within a certain wiring radius of your van. The solar panels collect direct sunlight and then transfer it into your van in such a way that you could park your van in the shade and still have access to great solar power.
However, portable solar panels are usually not as efficient as fixed solar panels and it can become tedious to have to pull them out every time you want to use them. Plus you are only benefitting from solar power if you have the portable solar panels out.
On the other hand, fixed panels will always be generating solar power for you as long as the sun is shining.
Solar Charge Controller Basics
Camper van solar panels just don’t know when to stop. While unlimited power is great, without the right solar charge controllers, your solar array could do some serious damage to your battery bank.
AGM batteries especially can’t be discharged to less than 40% of maximum capacity. A battery monitor can help you keep track of things, but it can’t actually affect the flow of power like solar charge controllers can.
So the whole point of a solar charge controller is to moderate both the voltage and the amperage of the incoming solar power so that your battery bank receives just enough power at just the right rate to stay happy.
Charge Controller Size
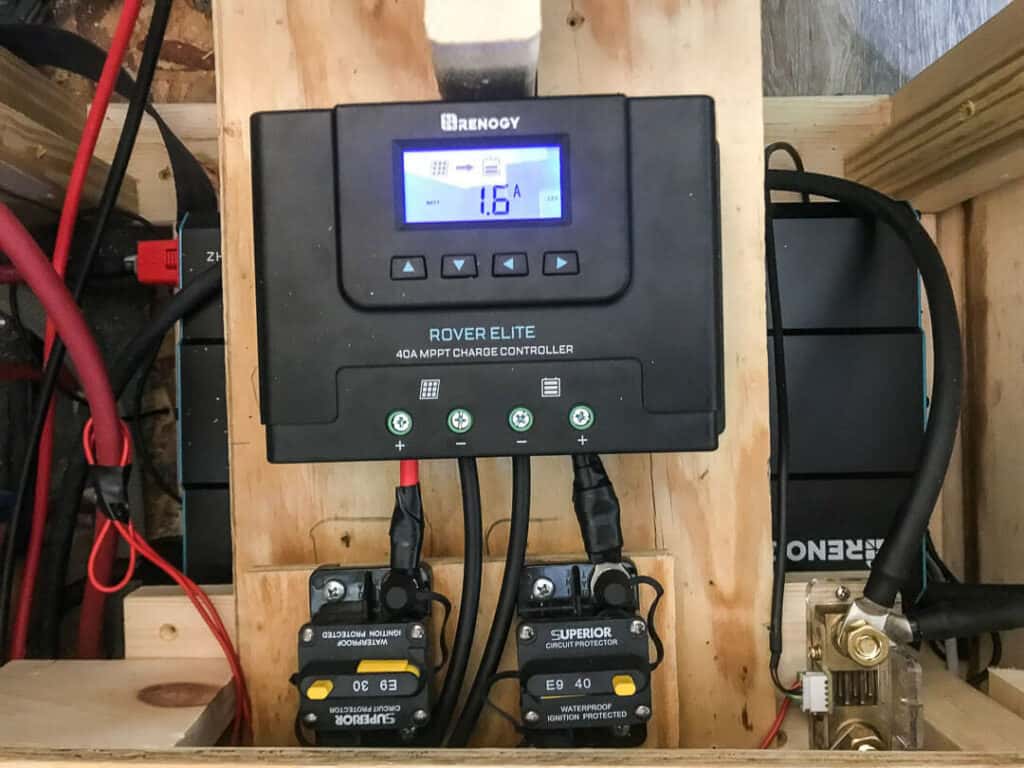
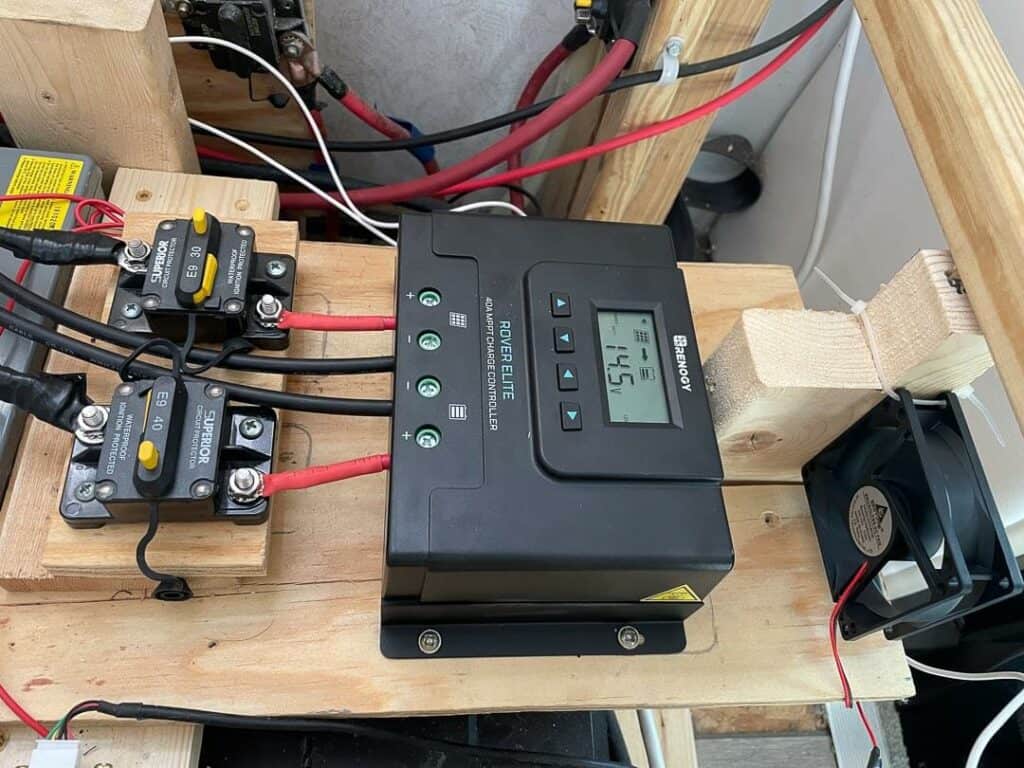
You will see that almost all charge controllers have a number in front of their name rating the amperage of that controller. For example, one of our favorite charge controllers is the 40 amp MPPT controller offered by Renogy.
What this means is that the charge controller is able to transfer energy from your solar panels up to a 40 amp flow. In other words, if your panels were capable of transferring energy at 50 amps into your controller, the controller would regulate the amperage and drop it to 40 amps delivered to your battery bank.
Since vans have limited roof space it is likely that most solar setups will only need a 30 amp controller at maximum. But you will want to assess this based on which solar panels you select and the current they generate combined when connected in parallel and/or series.
There are two types of solar charge controllers, though we only recommend the first type we’ll discuss.
MPPT charge controller
MPPT stands for maximum power point tracking, but you don’t need to remember that. All you need to remember is that MPPT means maximum.
These are the cream of the crop when it comes to wiring solar panels to your rig. Not only does this particular subsection of charge controllers prevent excess discharge or overcharging, but it also works with your solar panels to find the perfect operating voltage based on sunlight.
They are capable of handling more of a load more efficiently than PWM chargers, making them a better choice for illustrious camper van solar panels and those who want to treat their solar energy like shore power.
Modern MPPT controllers can even communicate with your cell phone via Bluetooth to make sure all the solar panels in your system are humming along efficiently.
Basically, these are the more sophisticated electrical systems, and the only reason not to opt for an MPPT would be if you only have one solar panel, a limited budget and minimal energy demands.
PWM charge controller
This style of campervan solar charge controller works like a heartbeat, sending pulses of energy to your battery system instead of a constant flow. A steady beat makes for better trickle charging, but the controllers are also capable of picking up the pace when need be.
Their handy little units, but they are simply incapable of handling much more than 150 Watts of campervan solar and lose out when it comes to efficiency. Why invest in a robust solar panel array if you’re not getting as much solar power into your van as possible?
PWM vs MPPT Solar Controller
PWM or “pulse width modulation” controllers are primitive and less efficient than their more contemporary counterparts. As such, we don’t really advise shopping for a PWM controller. While they are more affordable, they are far less efficient and only work well in a simple solar power system.
On the other hand, MPPT charge controllers are highly efficient, with as much as 99.5% of the solar energy collected by the panels being transferred to your batteries. They are more expensive than PW controllers.
But their efficiency alone makes up for the cost in the long run. Plus they also work well with more advanced batteries such as AGM and lithium.
Solar Panel Wiring
All that technology still has to get from one place to another the old-fashioned way: through a pile of wires. Getting your wiring done should be one of the first steps of a camper van conversion, that way, you don’t have to meander around your kitchen and bathroom area to connect to your starter battery.
Plus, you’ll have to insulate your wiring for safety, so you might as well make that a part of your complete insulation routine.
Wiring one panel is relatively straightforward, but the paths diverge into two main methods to wire all types of solar panels once you start setting up multiple panels.
Series wiring
To wire solar panels in a series, you’ll connect the positive battery terminal on the first panel to the negative terminal on the next. Your total voltage will be the sum of the voltage of each panel, and your total amperage will be equal to the output current of any singular panel. In other words, you double the voltage and keep the amperage the same.
This is important because the amperage determines the thickness of the wires required. And the thicker the wire, the more expensive it can be. So wiring two solar panels in series keeps the amperage low enough to use relatively small gauge wires on the roof.
The main flaw in series wiring is that it cannot handle the shade very well. The technique is more efficient and capable of pumping out the volts, but if shade touches any panel, they all are thrown out of whack. This wiring technique can also only be used with an MPPT controller. Your typical PWM can’t handle the volts.
Parallel Wiring
This method requires connecting all of your solar panel’s positive terminals together and connecting your negative terminals together. It results in the exact opposite figures as series wiring – a total amperage that is the sum of all of your panels but a total voltage that matches the output voltage of a single panel.
Unlike the name, solar panels wired in parallel can work independently of each other, making the technique a better choice for less than complete sunlight. Especially when your roof starts to get crowded with vents and outdoor toys, shade can be a killer.
So parallel wiring can help lessen the load because if one of the two solar panels is in the shade it will not reduce the overall output of the two solar panels together.
Parallel wiring systems are best used with PWM chargers or low-voltage systems.
Wiring in series, and therefore with low amperage, allows you to use smaller gauge wiring, which is easier to maneuver and saves you a few bucks. The low-voltage parallel systems pump out higher amps that require a larger gauge wire.
No matter which technique you employ, you’ll want the wire run from the panel to the charge controller through to the battery to be short as possible, but that is especially important for parallel arrays. The higher the amperage, the greater the loss along the wire.
If you have 4 panels, which is sometimes rare and overkill in van life, then you may consider running series-parallel. In this manner you will connect 2 panels in series, creating one set of panels. Do the same for the other two solar panels. And then connect these two sets in parallel. This will increase both your voltage and capacity.
No matter your methods, you should favor a watertight connection plug called MC4 to connect individual panels together. To calculate your wire size, you should figure out the voltage of your batteries, the maximum draw of your panels, and the length of the run. A 12 gauge AWG wire or lower is a safe size to start out with, but you can find the perfect wire size for your panels in the owner’s manual.
Tools, Materials and Process for Solar System Installation
We learned how to install our first solar system from watching YouTube videos. But there are definitely things that we did not do as correctly as we could have if we had the right tools and knowledge beforehand.
So hopefully we’ve given you quite a bit of knowledge about the fundamentals of your solar system. Now when it comes to installation, these are the tools you’ll want to invest in to make your installation as easy and watertight as possible.
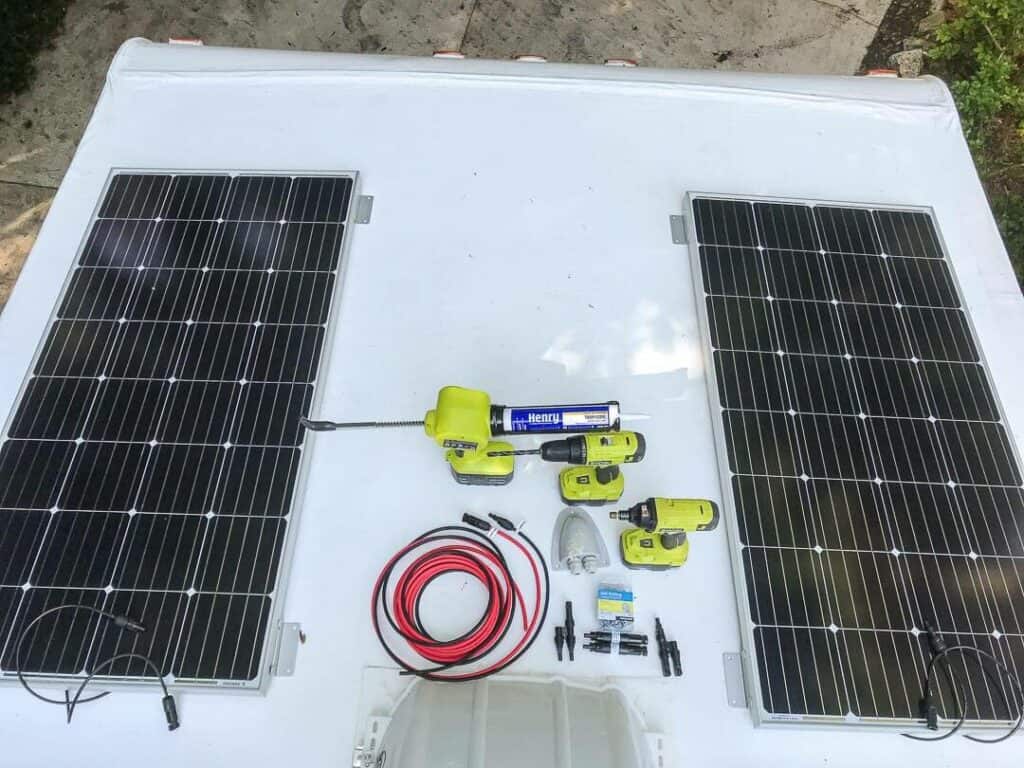
- 3/4” #10 self-tapping screws
- Drill & Screw Gun
- Butyl tape
- Dicor Lap Sealant
- Heavy-duty wire cutters
- Heavy-duty wire crimpers
- Solar tray extension cable
- Appropriate gage wire
- Appropriately sized battery lugs
We can’t cover all of the details of solar panel installation in this post as your van setup may vary depending on the wide number of options we’ve presented. However, the basics are the same:
First, disconnect your battery when working on the solar panel installation. You want to prevent any energy from flowing through your electrical system (and into you!) while you are working on it. Do note that a 12-volt shock is typically not dangerous. But it will definitely startle you!
Next, cover the solar panels when they are on the roof before you connect the wires to run into the van. Typically you can just use the cardboard box they were shipped in. If the solar panels are not covered and are in direct sunlight during the installation process they will generate energy and want to send it somewhere. So keep them from collecting power until you are ready to test them.
Anything you screw into the roof should have a strip of butyl tape beneath it. This creates a firm seal that will not allow water between the roof and the item you are screwing into the roof. Whether you mount an aluminum bracket or simply screw the Z-brackets into the roof, butyl creates an essential watertight seal.
Any screws or holes into the roof should have an adequate amount of self-leveling lap sealant to ensure water does not enter the van through the roof. You can also consider adding a strip of Eternabond tape over the screws before applying lap sealant around the edges of the Eternabond.
Measure twice, drill once when it comes to bringing the wires from the solar panel junction box into your van. Try and find a place that keeps the wire run as short as possible from the solar panels and that enters the van in an unobtrusive manner (such as into a cabinet or specific part of the wall).
Once you pop a hole in your roof you don’t want to realize that you put it in the wrong place and need to make another hole. You’ll want to only have the 2 solar wires and a dab of lap sealant in the hole. And you don’t want to make the hole too wide. It only needs to be wide enough to bring those 2 solar wires into the van.
Consider using breakers, which you can leave in the “open” position, instead of fuses as an additional safety precaution when installing your solar components.
Connect all positive wires to the charge controller first. This order does not matter, whether the battery or solar wire is connected first.
Then connect the negative wire from the negative battery terminal (or busbar) to the controller first. This ensures a proper connection between the charge controller and the battery prior to any solar input.
After that, connect the negative solar panel wire to the controller second. This ensures that solar energy is not coming into a controller that has nowhere to send the energy, thus causing it to overheat.
If you have used breakers, close the CONTROLLER→BATTERY breaker first to establish the connection between the battery and the charge controller. Then close the SOLAR → CONTROLLER breaker second to allow energy from the solar panels to flow into the charge controller and from there to the battery bank.
Finally, uncover the solar panels to allow them to begin to operate. Head back inside and monitor the charge controller to ensure that power is flowing into the batteries (assuming this is done during daylight).
Frequently Asked Questions About Van Life Solar
Although we hope that we have explained how a solar setup will look for your campervan, there are still some solar frequently asked questions we’ll address below.
Do I need Solar Power for my van?
You need water, food and shelter. But you don’t need solar. However, solar panels, charge controllers and other tools and equipment for installing solar is so reasonably affordable that you will find very few van dwellers who do not have at least one panel on their roof.
There are alternative ways to keep your batteries topped off. In van life, the most common method is to use your vehicle’s alternator to provide additional energy to your house batteries while you are driving.
You could also install a shore power connection as part of your van’s electrical system and plan to plug it in every so often. This could be at a campground (where you may also find a hot shower and maybe laundry facilities) or at a friend’s house.
The less common option for van life, but common among other RVers, is to have a generator that acts as your portable shore power.
But back to whether or not you need solar for your van. The absolute answer is “no.” But we’d recommend that you at least consider the idea of leaving roof space for later addition if you find that you do need solar to keep up with your power consumption on the road.
An even better option would be to opt for a middle-of-the-road solar kit that has everything you need for a quick installation.

This kit is our top recommendation for a simple, affordable solution for solar. With 200W of potential power, this would pair well with 100Ah of usable battery capacity (100 Ah lithium battery or 200 Ah gel of AGM battery).
And the 40 Amp MPPT controller is more than enough to be able to add more panels later and not need to upgrade your charge controller.
The panels are sized to fit in pretty much any orientation you would need them to be installed on your roof. And the installation is pretty straightforward with such a basic kit.
But, if you are on the fence about whether you need to add solar panels to your van, and you are coming down to the “last dollar” in your van build budget, we would recommend that you spend that last dollar on your battery bank rather than on solar.
Having a larger, particularly lithium, battery bank will serve you better in the long run. You will likely be able to keep the batteries topped off through frequent driving. And with a large lithium battery bank, it is not likely you’ll ever risk using up all of the battery capacity before you find some way to top it off.
READ MORE: If you’re looking to spend that last dollar in building a better battery bank be sure to read this post on what to look for and our best recommendations for campervan batteries.
How much does it cost to set up solar on a van?
The cost of a solar power system for a van varies from a few hundred dollars to a few thousand depending on a variety of factors. The major factors include what kind of solar panels you choose, how many you want to install and the quality of your charge controller.
Each of the required individual components varies in cost by their own factors, which we’ll explain in more detail.
You should expect to spend between $500 – $1,000 for a reasonable solar setup for your van. Of course, you can go higher or lower if your budget requires or permits.
Decent solar panels will likely range around $1 per watt. So expect a range in prices for a 100W solar panel to be around $100. Most vans equip themselves with at least 2 solar panels.
Charge controllers will vary in price as well. You can expect to spend anywhere between $75 – $300 for a decent charge controller for your solar power system.
And then there is some hardware and wiring in between that will cost between $50 – $100 or more.
You can often find solar kits that will bundle a wide range of solar panel wattages with all of the other required components. Solar kits will run between $500 – $1,000 or more depending on the brand, kind and size of the solar power system.
Which solar panel is best for van life?
The best answer to this question, from our perspective, is any monocrystalline solar panel that is properly connected to a working charge controller. Several years ago there were only a handful of manufacturers in the solar panel space.
This meant your options were fewer both in panel sizes and brand. In 2022, there are dozens of brands with many different kinds, styles and sizes of solar panels.
We put together a great post on our top recommended solar panels. You can read that post HERE.
In short, we’re big fans of this 100-watt monocrystalline panel from Renogy. We’ve used them on every RV we’ve owned or worked on since we began living nomadically in early 2018.
And if you read on to the section below about how much solar do I need for van life you will find we use it as our example because it is a solid choice to rely on for your campervan solar setup.
But there are other great options as well if you want to shop around. Be sure to check out our post on the best solar panels or stick with our top recommendation.
How much solar do I need for van life?
You can’t really have too much solar power for your van. But you can have too little. Actually, you don’t actually NEED solar in the first place. While it is a very common addition to most campervans, it is a luxury and there are plenty of ways to get around adding solar to your van.
However, if you want to calculate the exact amount of solar panel wattage that you need then you will need to do some experimentation with your appliances as well as some basic math.
But before you grab a pen and paper and head out to your van (or use your imagination), there are 2 basic rules of thumb that you could use to estimate how many solar panels you need.
- Assume 100W solar panel provides around 30 Ah per day, or
- Match your battery capacity in solar panel wattage + a little overage (Ex: 200 Ah battery bank = 200W solar + 50W extra = 250W solar)
The first rule of thumb is a little more precise and supported by math, so now lets dig out that pen and paper and head to the van.
Power is stored in your battery in a quantity known as Amp Hours. Flooded lead-acid batteries and lithium batteries alike will be rated in Amp Hour capacity. One amp hour is the equivalent of powering a device that requires 1 amp to run for exactly one hour.
A common battery size is 100 Ah. If you have a flooded lead-acid battery, you should never use more than 50% of this capacity. If it’s AGM, you can use up to 60% and lithium you can use upwards of 80-90%.
Assumption: So let’s assume that you have 100 Ah of usable battery capacity in your battery bank. This could be one 100Ah lithium battery or 2 x 100Ah AGM (note, we don’t recommend flooded lead-acid batteries for van life).
So here’s where the calculations come to play. You will want to know how many amps it takes to run each appliance in your van before you can calculate how much power you use, and would thus need to replenish, with solar power.
If you have a battery monitor, this process will be simple.
- Simply switch on an appliance and see the draw in amps that come off the battery. Do this for every device you would possibly run at any time in your camper. (You can use this cheatsheet from GoPower if you want to try and skip some steps. But note they don’t tell you how many you need, just which product of theirs to buy.)
- Next, estimate the number of hours you would operate the appliance. Multiple its amp usage by this number of hours to get the total number of amp-hours the appliance would consume from your battery during the course of one day.
Assumption: A Fan-Tastic fan may draw 2 amps on its middle setting and you will run it for 10 hours overnight.
2 amp/hr x 10 hrs = 20 amp hours of consumption
- Do this for every appliance to get an idea of the total number of amp hours you would use throughout the course of the day.
Assumption: Let’s assume that your total power consumption is 80 Ah from your usable battery capacity.
To keep your battery bank healthy you will need to offset this use by adding back that same amount of power from other sources. This could be shore power, a generator, your alternator or solar power.
At this point, you will want to look into various solar panel options and determine their maximum solar output in amperage and voltage. Read the “specs” section of the item description.
For example, a single 100-watt Renogy monocrystalline panel can provide approximately 5 amps at 20 volts. Power (in watts) is equal to current (in amps) times voltage (in volts).
So 100W = 5A x 20V checks out.
This means that in perfect conditions, you could recover approximately 5 amps per hour for every hour of sunlight. Unfortunately, we’re never in perfect conditions when it comes to solar panels, so a general principle is to use the amps rating times 6 hours of sunlight.
ASSUMPTION: In this example, a 100W panel can generate 5 amps x 6 hrs = 30 Amp-hours.
So if you calculated that you consume 80 Ah per day using all of your various appliances, you simply divide this number by the 30 Amp-hours you collect through your solar panels.
80Ah / 30Ah = 2.66 solar panels (100W solar panels)
Because conditions are never perfect, we’d recommend that you round up to at least 3 x 100W solar panels in this situation.
Note: A common setup in van life is to have around 200 Ah of lithium batteries with approximately 400 Watts of solar, or a 1 to 2 ratio.
Wrapping Up
Hopefully, we’ve helped you understand the basics of each component you need and how they function in a basic van solar setup. You can build as large a solar panel array as you can fit on your roof and combine fixed with portable panels to create an even larger solar array.
Or you can keep it simple with just portable solar suitcases as your basic solar setup. How much solar you need depends on how much power you anticipate drawing and what other methods you may plan to recharge your batteries.
But regardless of however much solar you choose, we think you should definitely plan to incorporate a solar setup into your van build.
This post may contain affiliate links. That means if you make a purchase a product we recommend using the links in this article, we may receive a small commission at no extra cost to you. We promise to use this pocket money to buy lots of coffee and fuel for the campervan to keep us enjoying #VanLife for just a little longer. We appreciate your support, and only recommend products we know and trust. Thank you friends!